The Replacements Gig Poster – Applying Abstraction
In this tutorial you will revisit the concept of abstraction through the use of functions.
Functions help us to avoid writing repetitive code.
Recall the acronym D.R.Y. – don't repeat yourself.
Don't Repeat Yourself
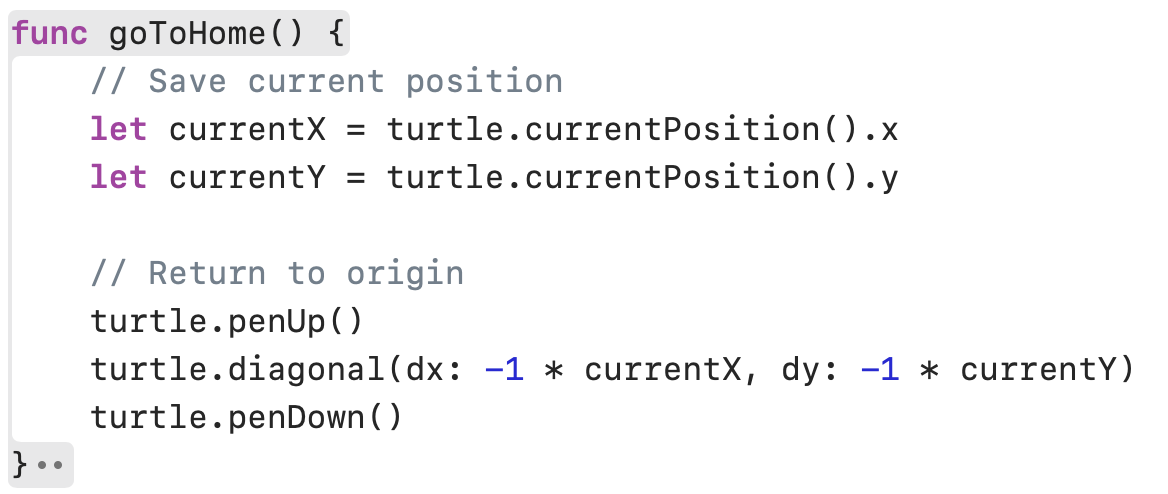
When making drawings in module one of this course, some students made use of this function to move the turtle back to the origin of the canvas:
func goToHome() {
    // Save current position
    let currentX = turtle.currentPosition().x
    let currentY = turtle.currentPosition().y

    // Return to origin
    turtle.penUp()
    turtle.diagonal(dx: -1 * currentX, dy: -1 * currentY)
    turtle.penDown()
}
For example, when authoring this sketch in a prior year, Matthew Zhang used the goToHome function to isolate each part of his code:
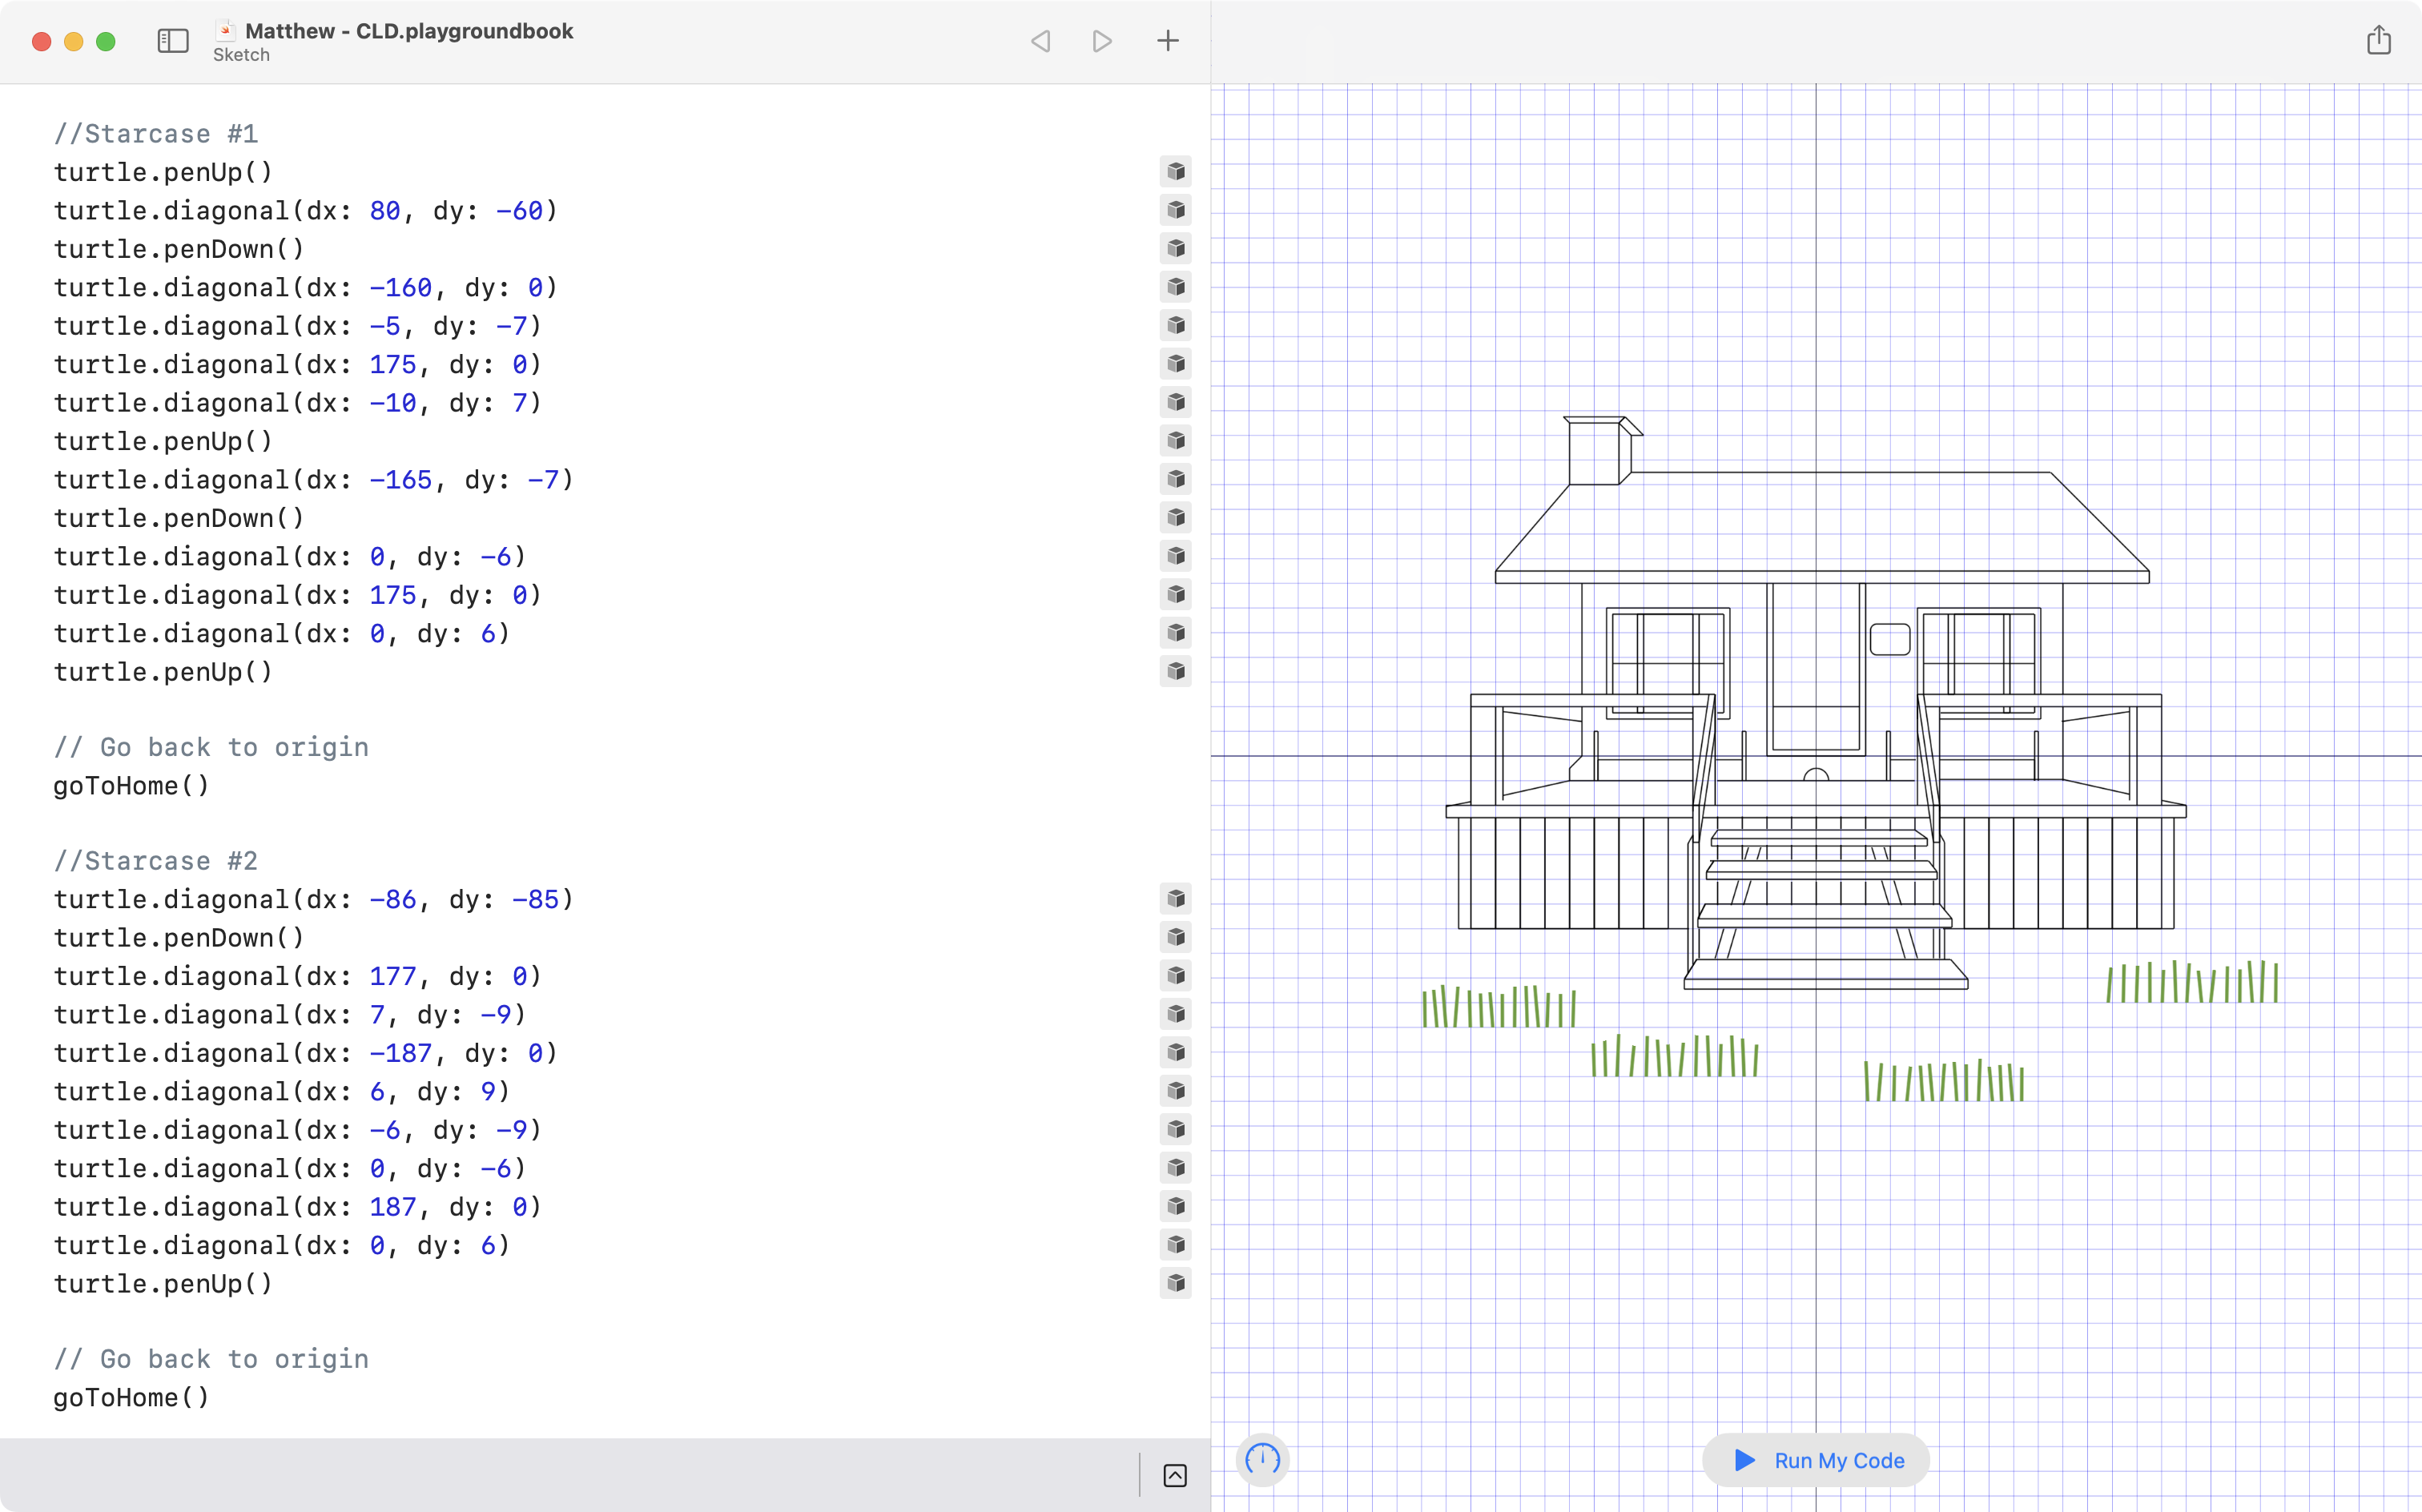
This meant that if Matthew needed to change the turtle's movements in an earlier part of his drawing, it would not impact the movements of the turtle in later parts of his drawing.
Matthew could have copy-pasted the code inside his function to do this:
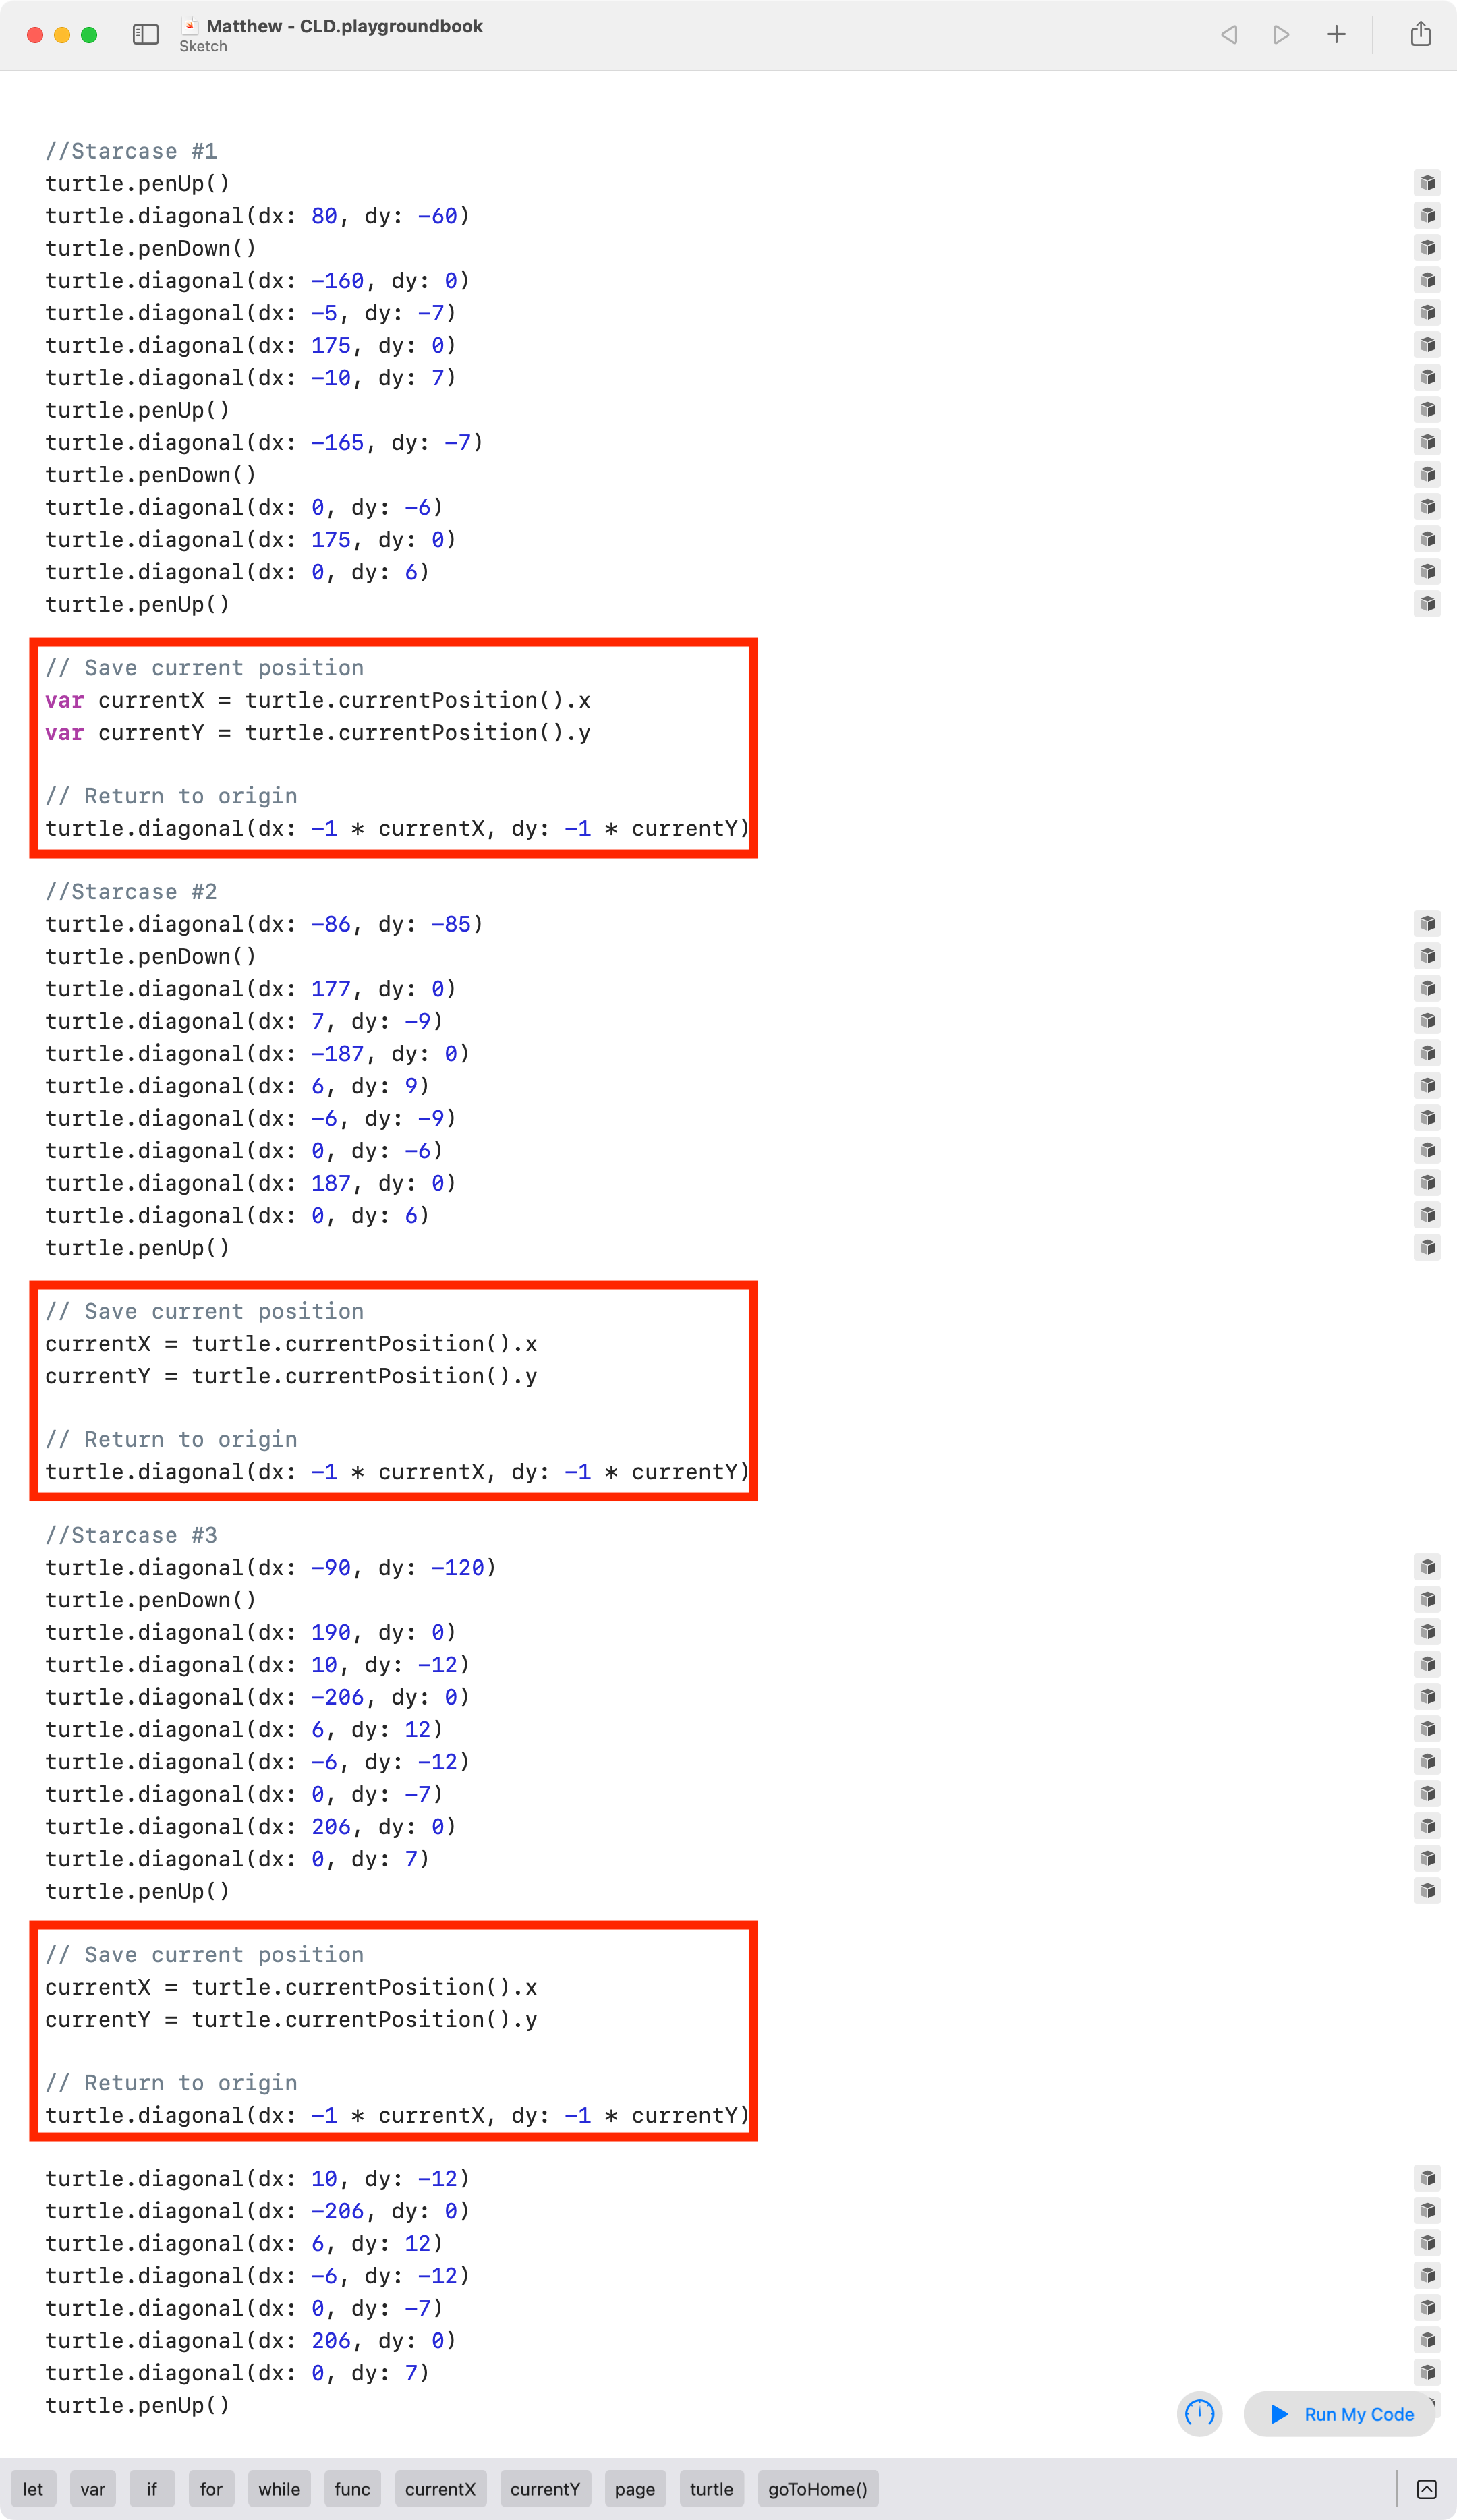
However, that results in multiple lines of essentially identical code.
It is better to teach the computer how to return to the origin by defining a function:
And then invoking, or calling, the function whenever you want to make the computer carry out the behaviours described in the function:
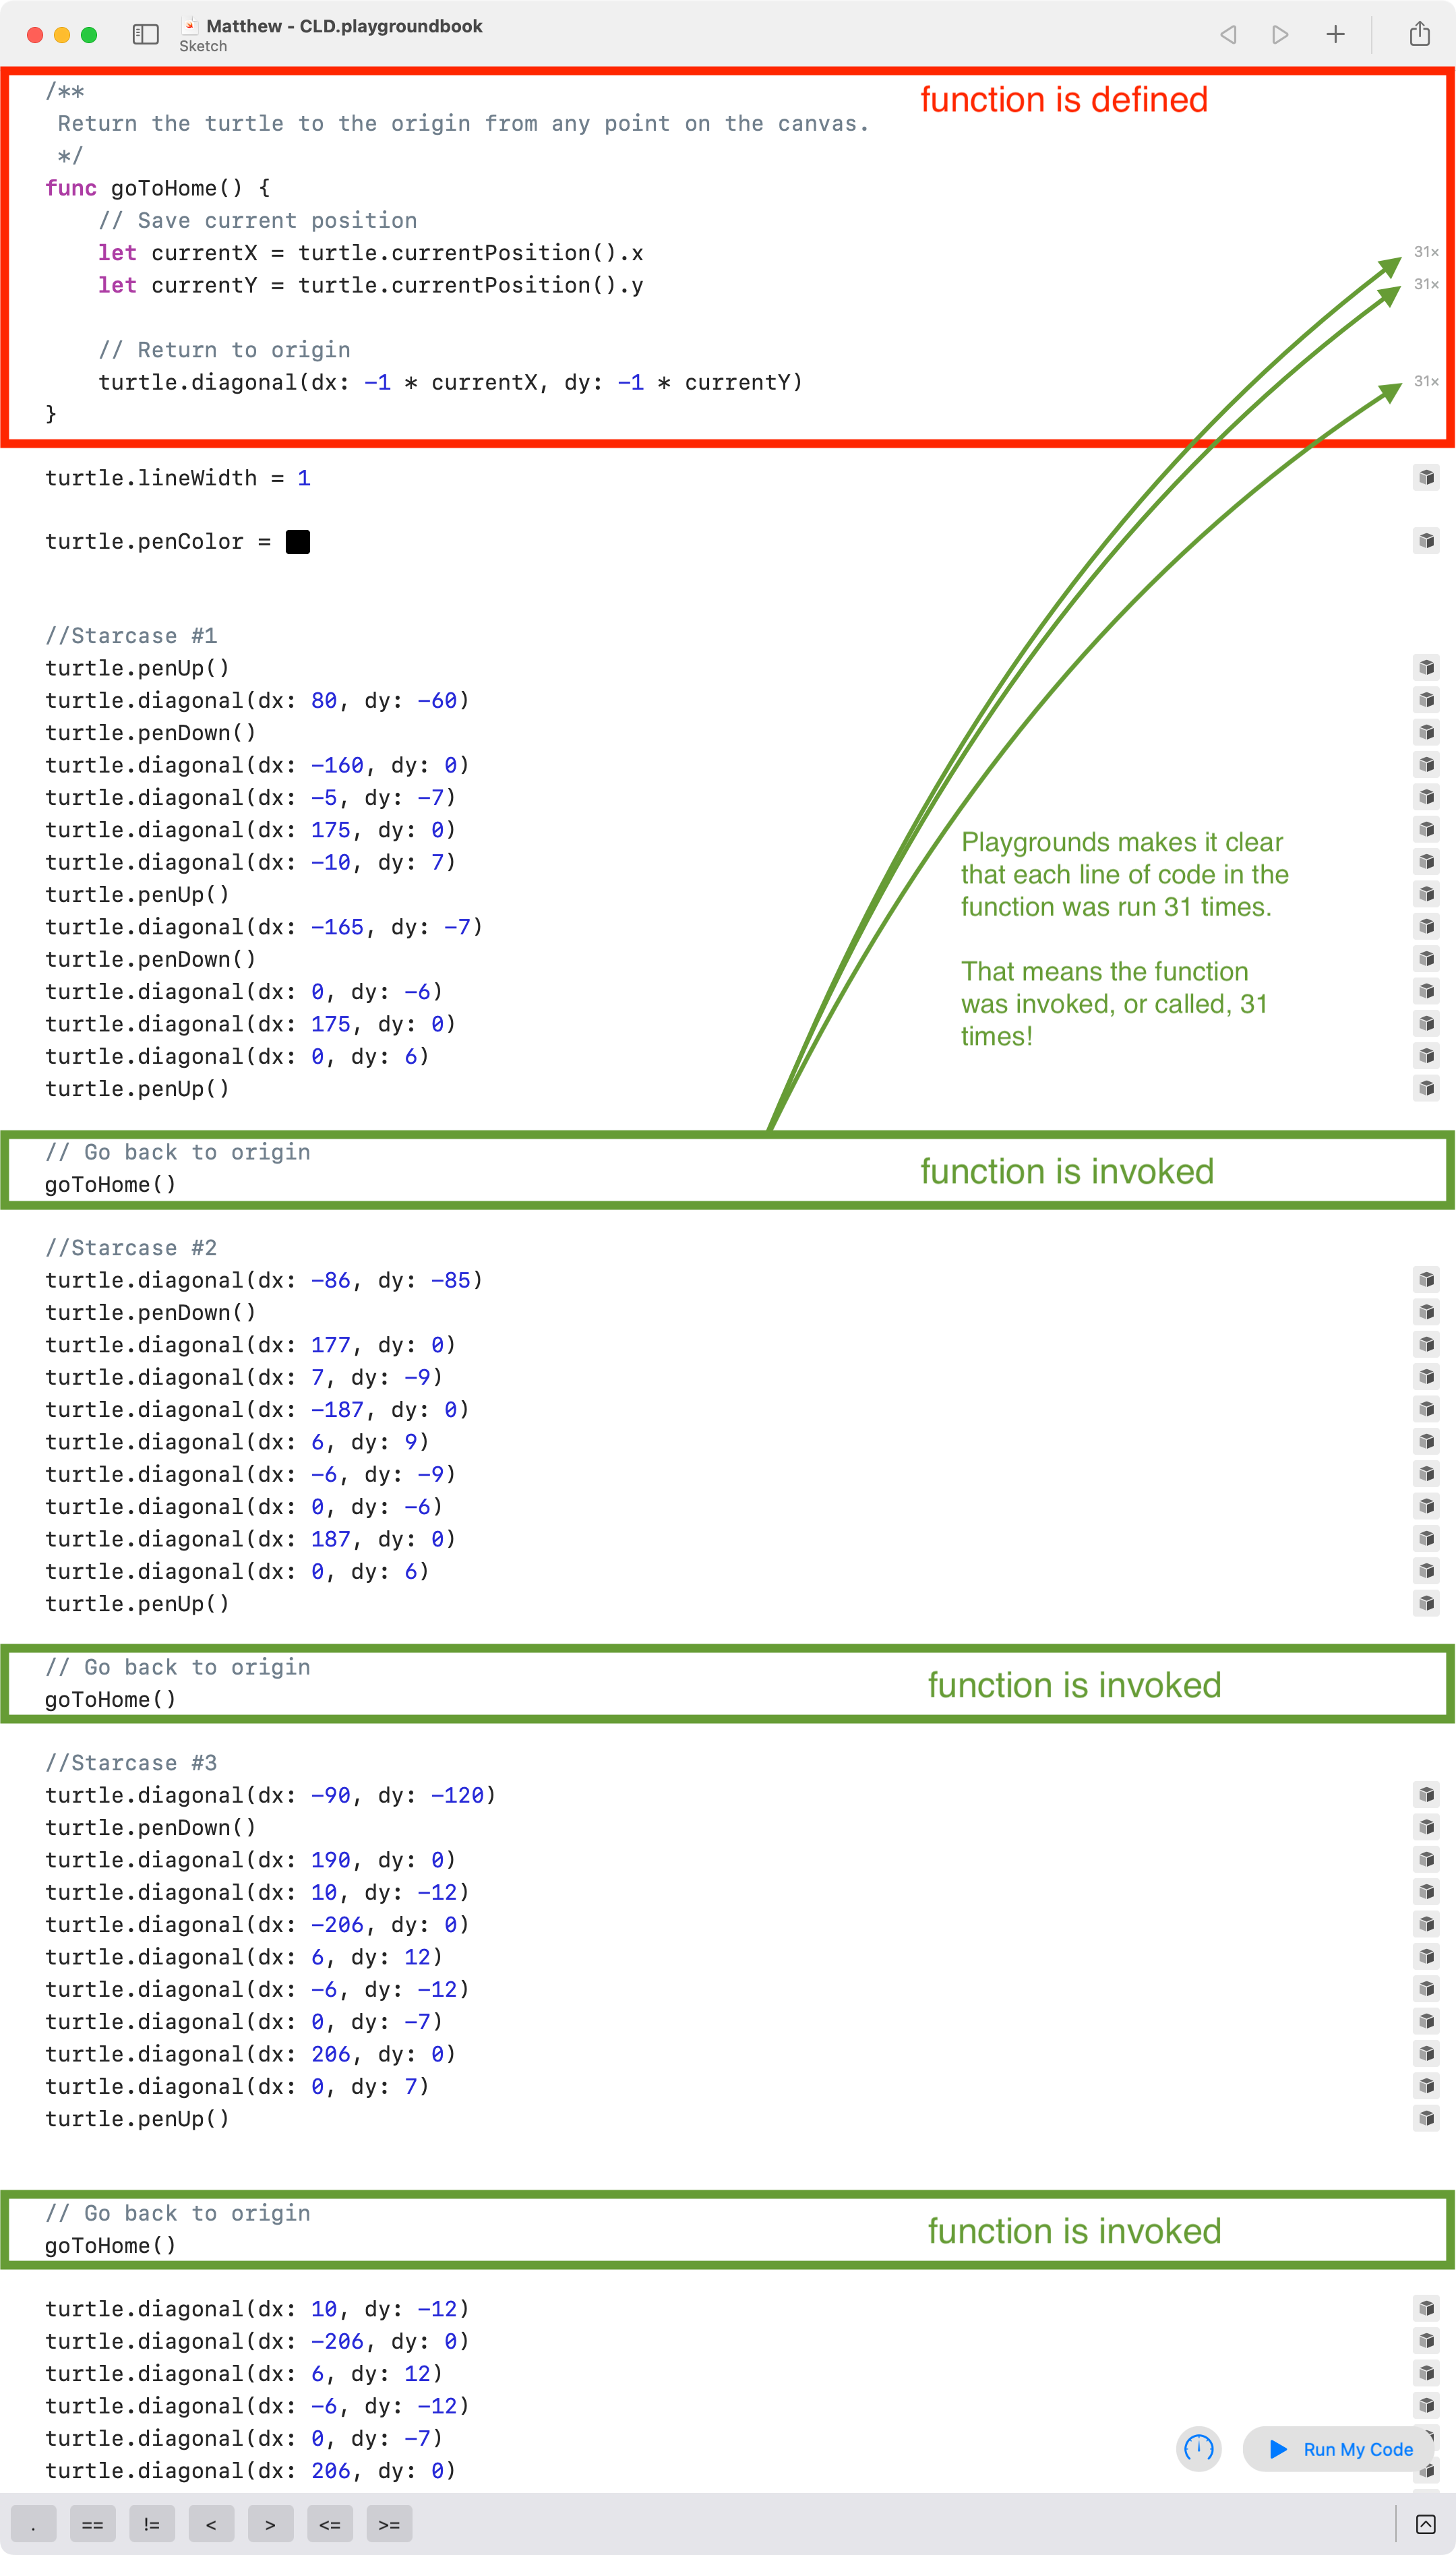
Note how Matthew's program invoked the goToHome function 31 times!
If he had simply copy-pasted the functionality, he would have used 186 lines of code:
By instead defining a function, and then invoking it multiple times, Matthew used this many lines of code:
Matthew's program was significantly shorter as a result!
We can apply abstraction the same way when authoring gig posters to save lines of code.
Let's start by analysing the poster to make a rough plan.
Making a Plan
Consider the following gig poster:
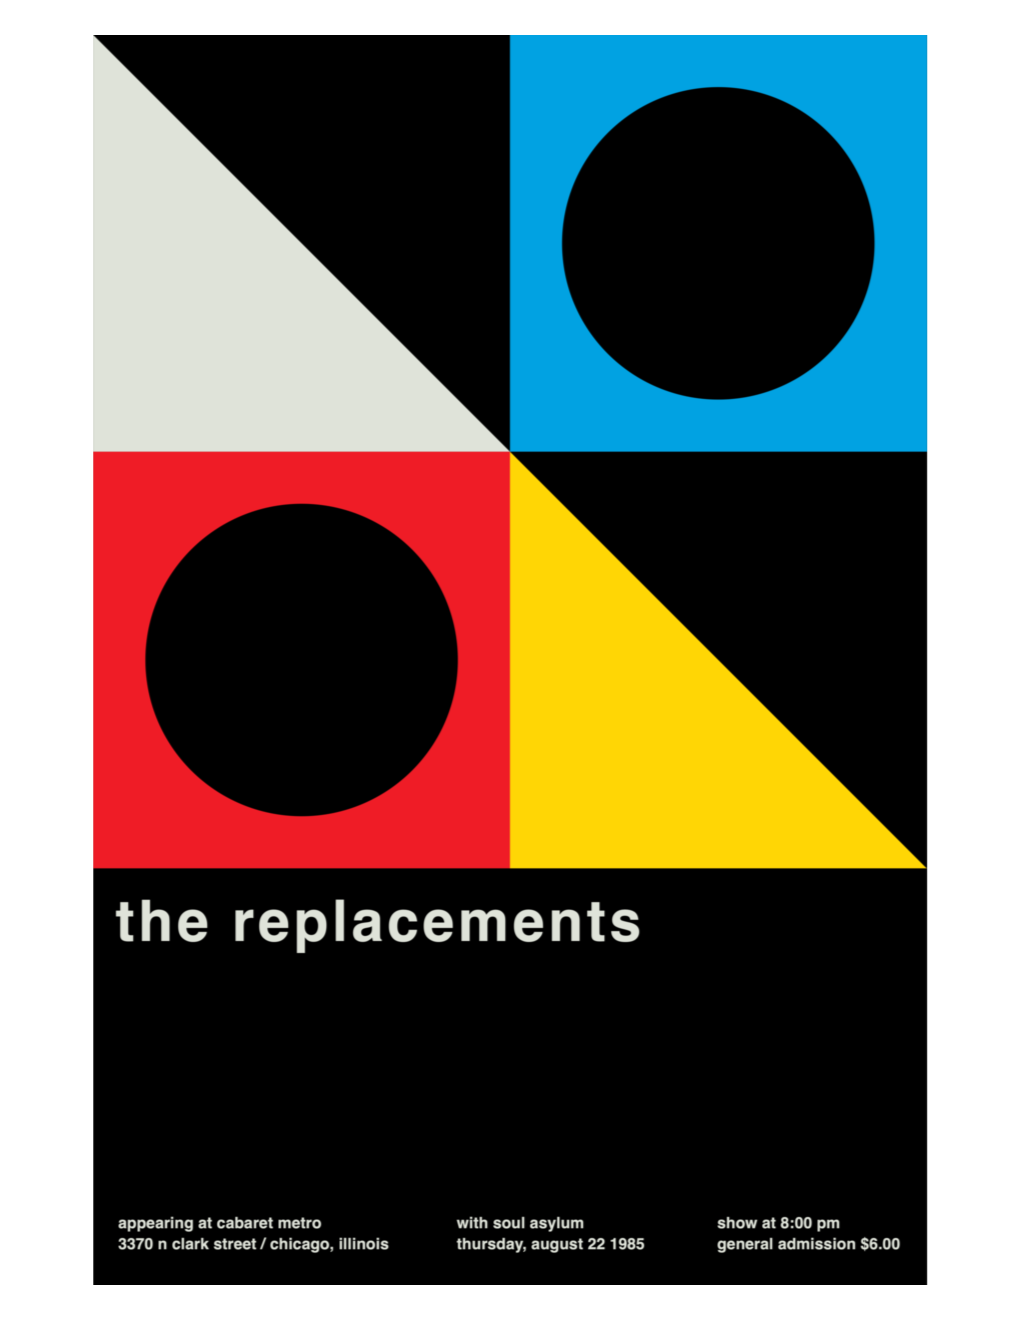
What similar elements do you see in this poster?
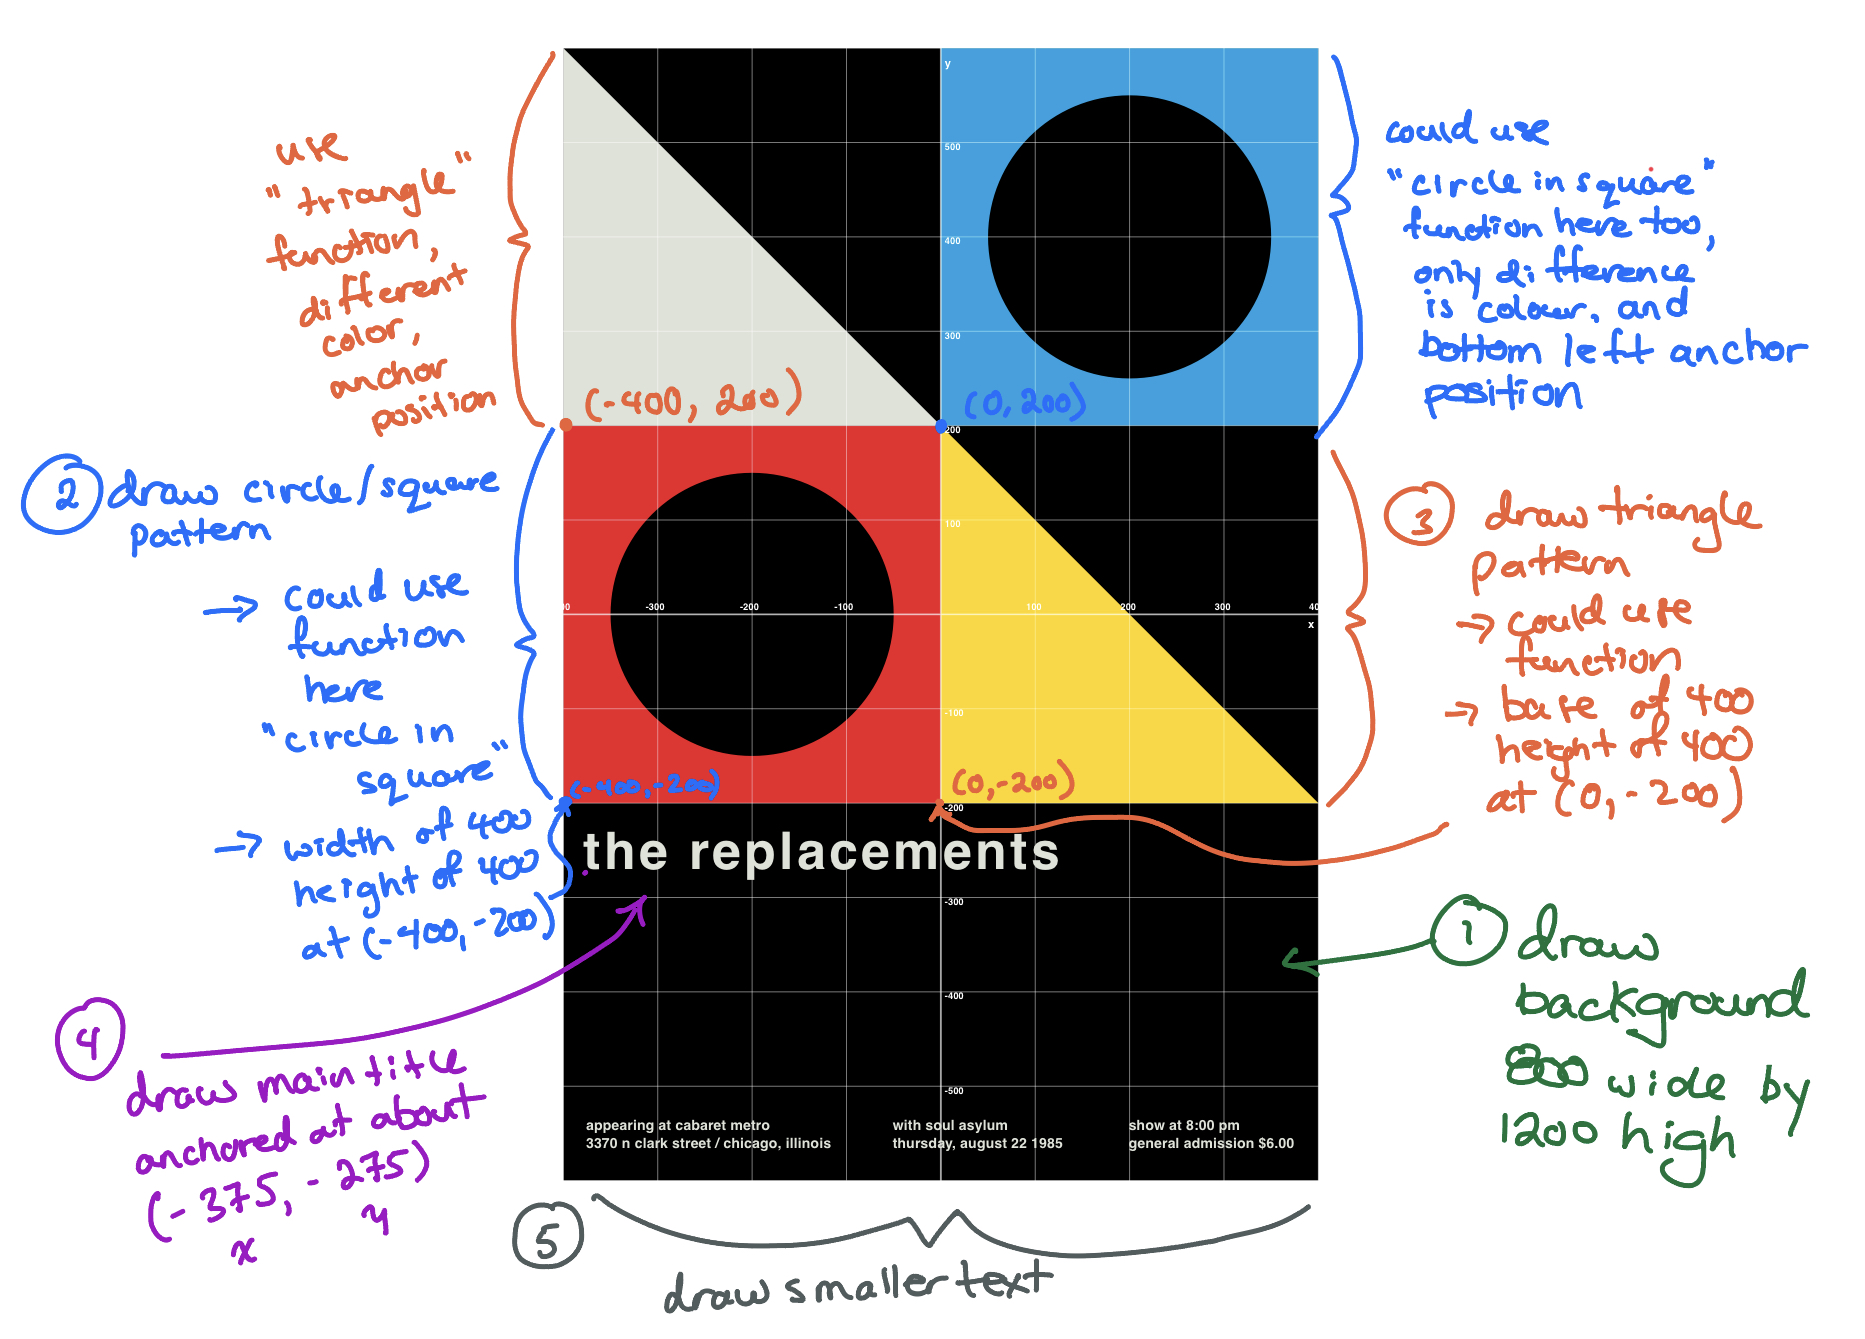
It might be helpful to view this poster against a grid:

We can reproduce this poster by applying the concepts of sequence and abstraction.
With your partner, mark up the planning sheet you have been provided with, and:
- number elements of the drawing to indicate what order they might be drawn in (sequence)
- identify where a function might be used (abstraction)
- look for visually similar elements in the drawing
- consider the position of each repeated element
- identify what is the same, and what is different, for each instance where there is something that is visually similar
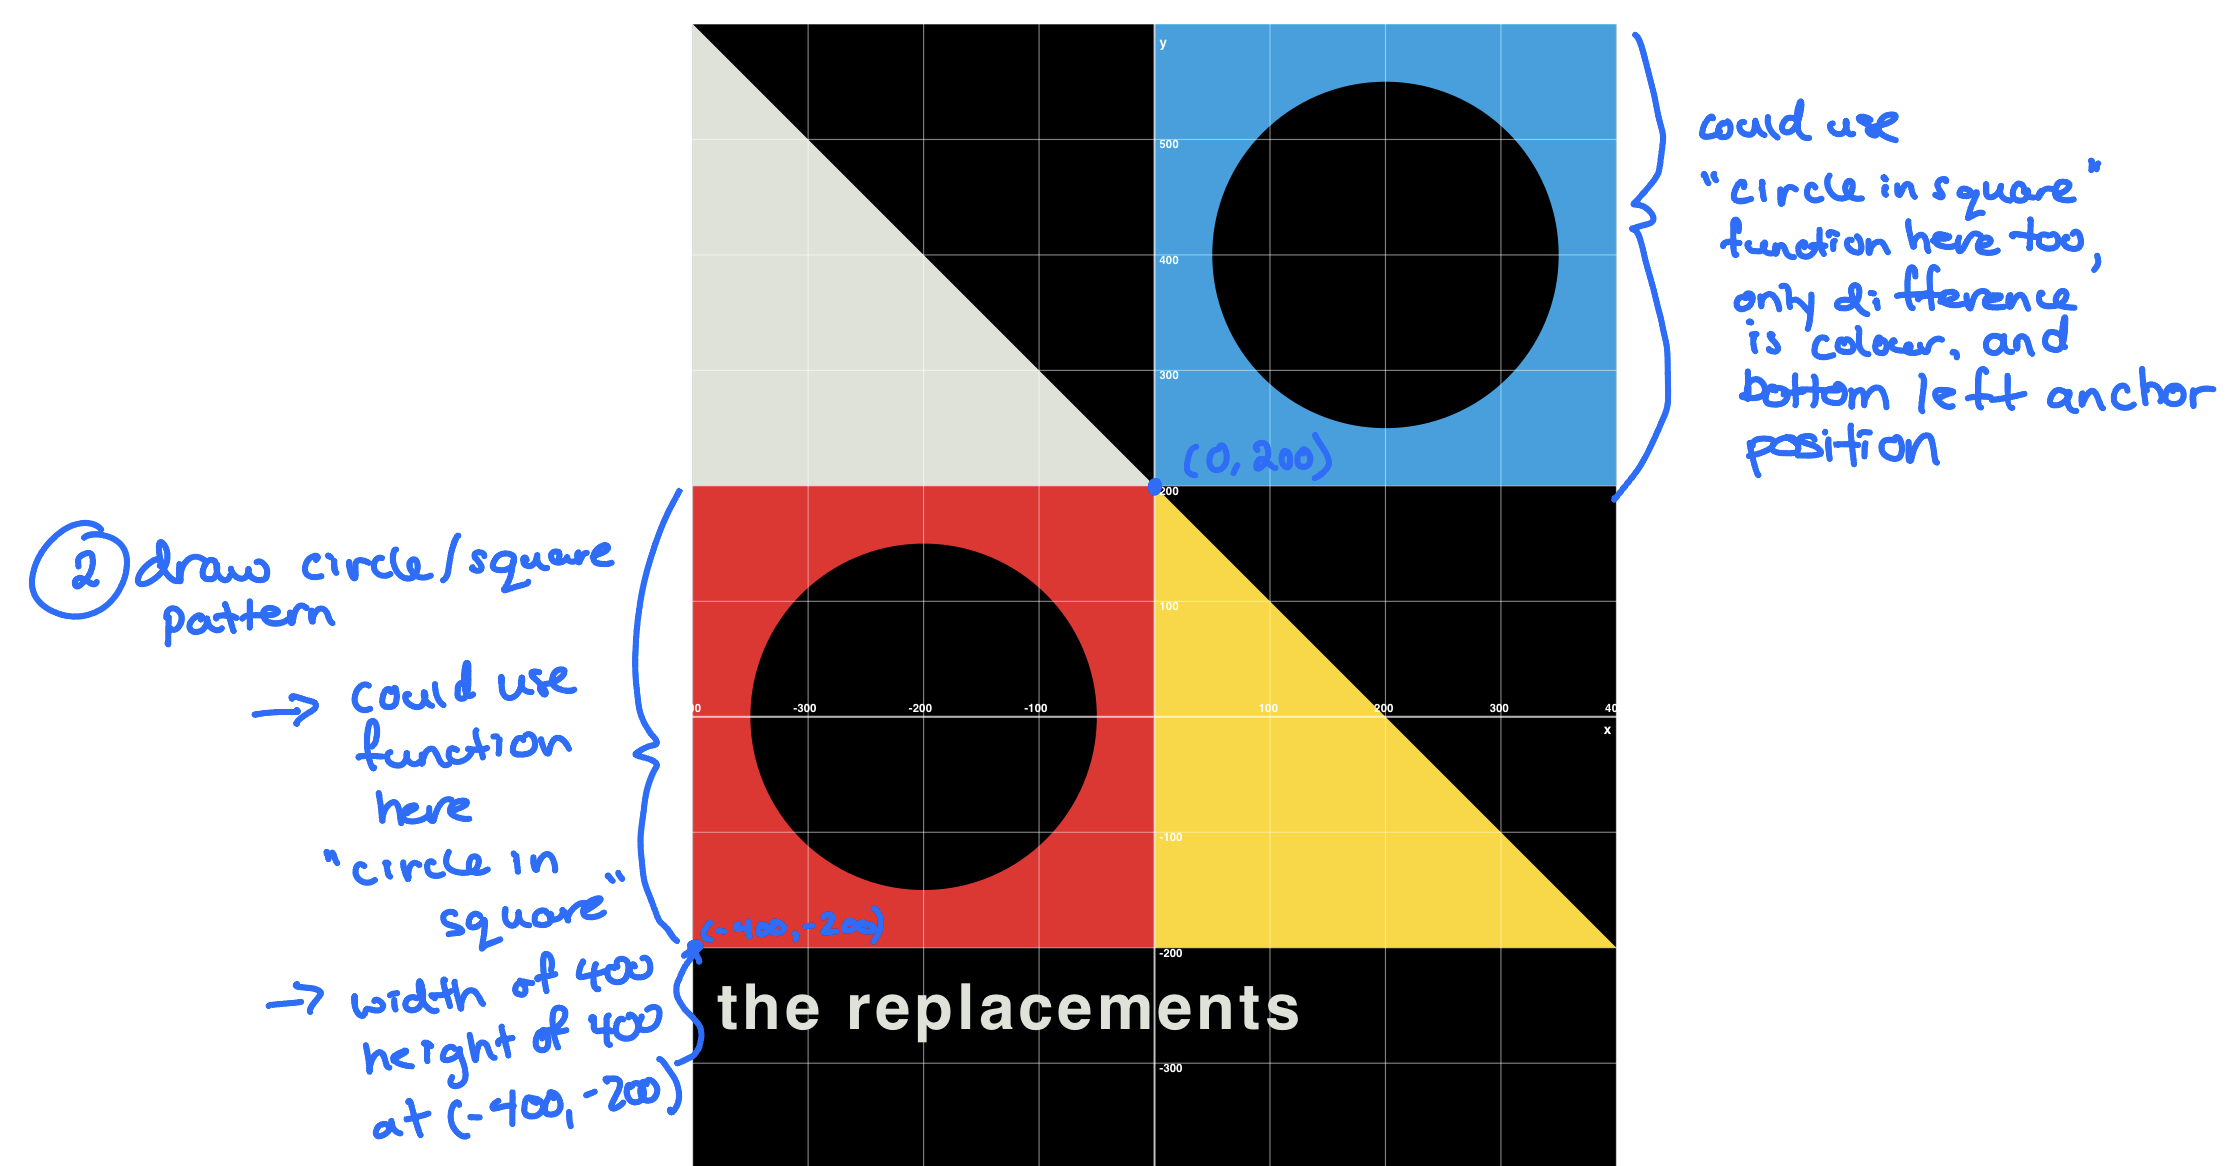
After some thought, you may have come up with something like this:
Let's look at how to implement this now.
Implementation
Create a new playground
Make a copy of the Sketches Template, renamed to be titled The Replacements.
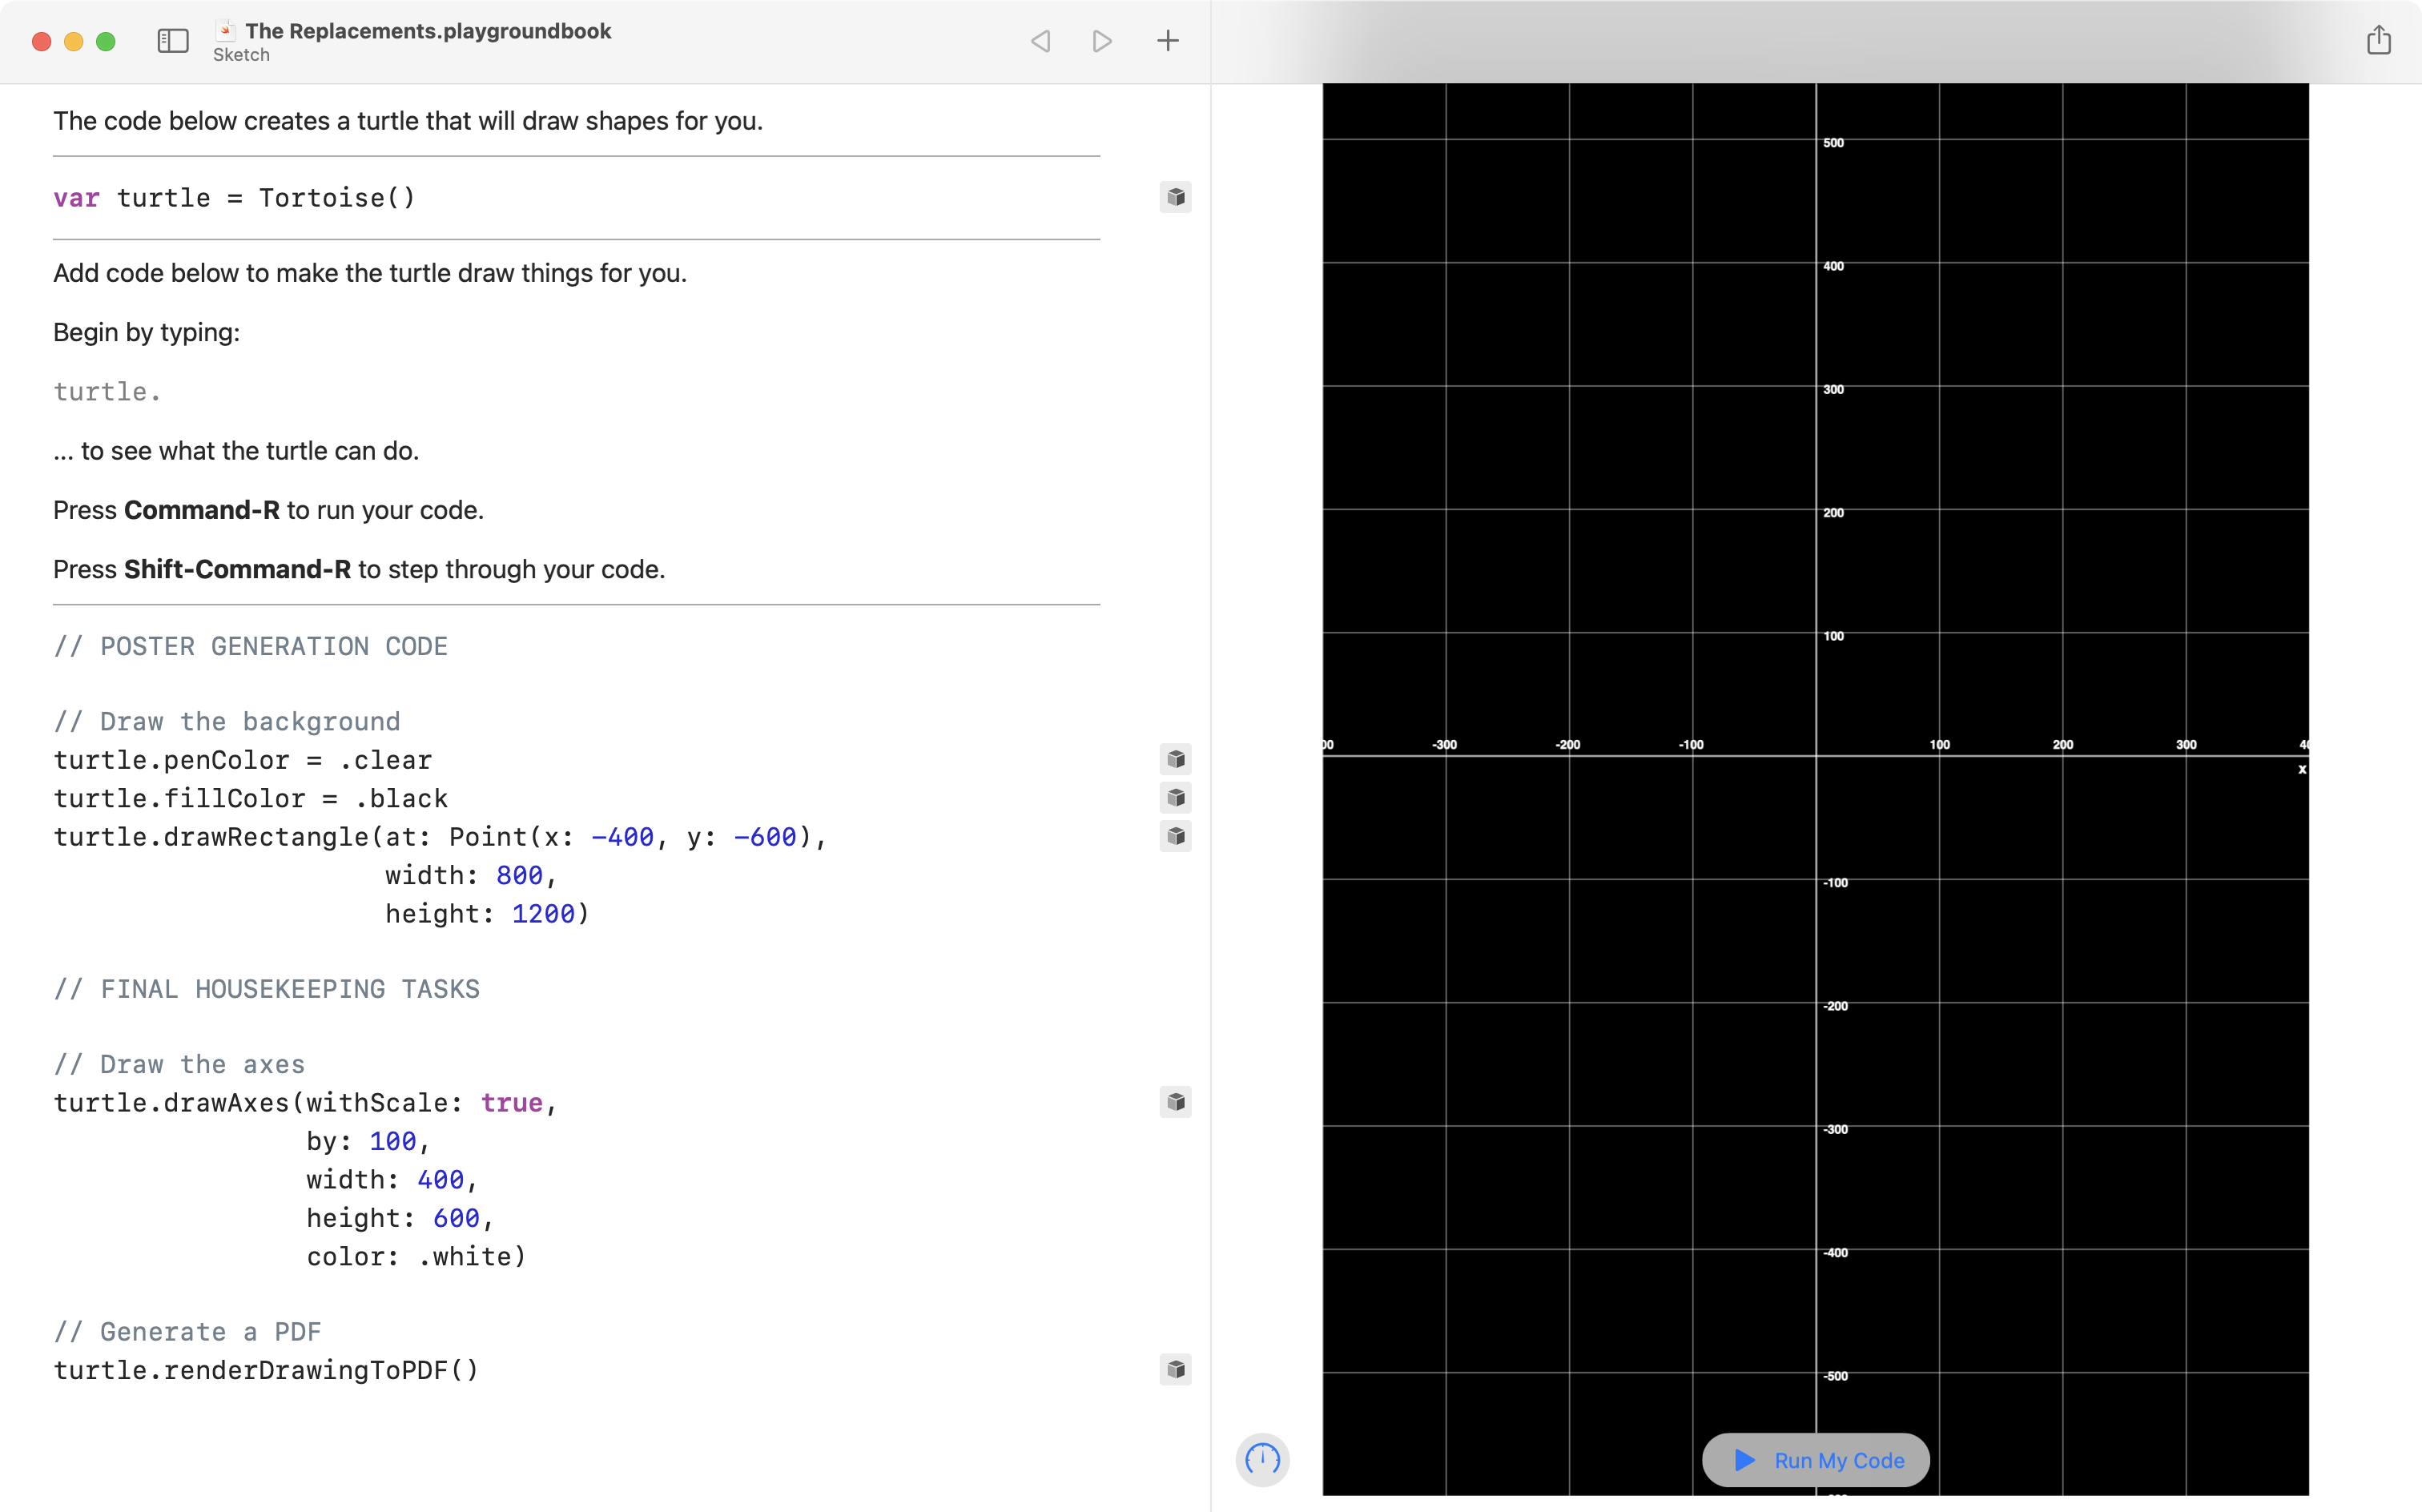
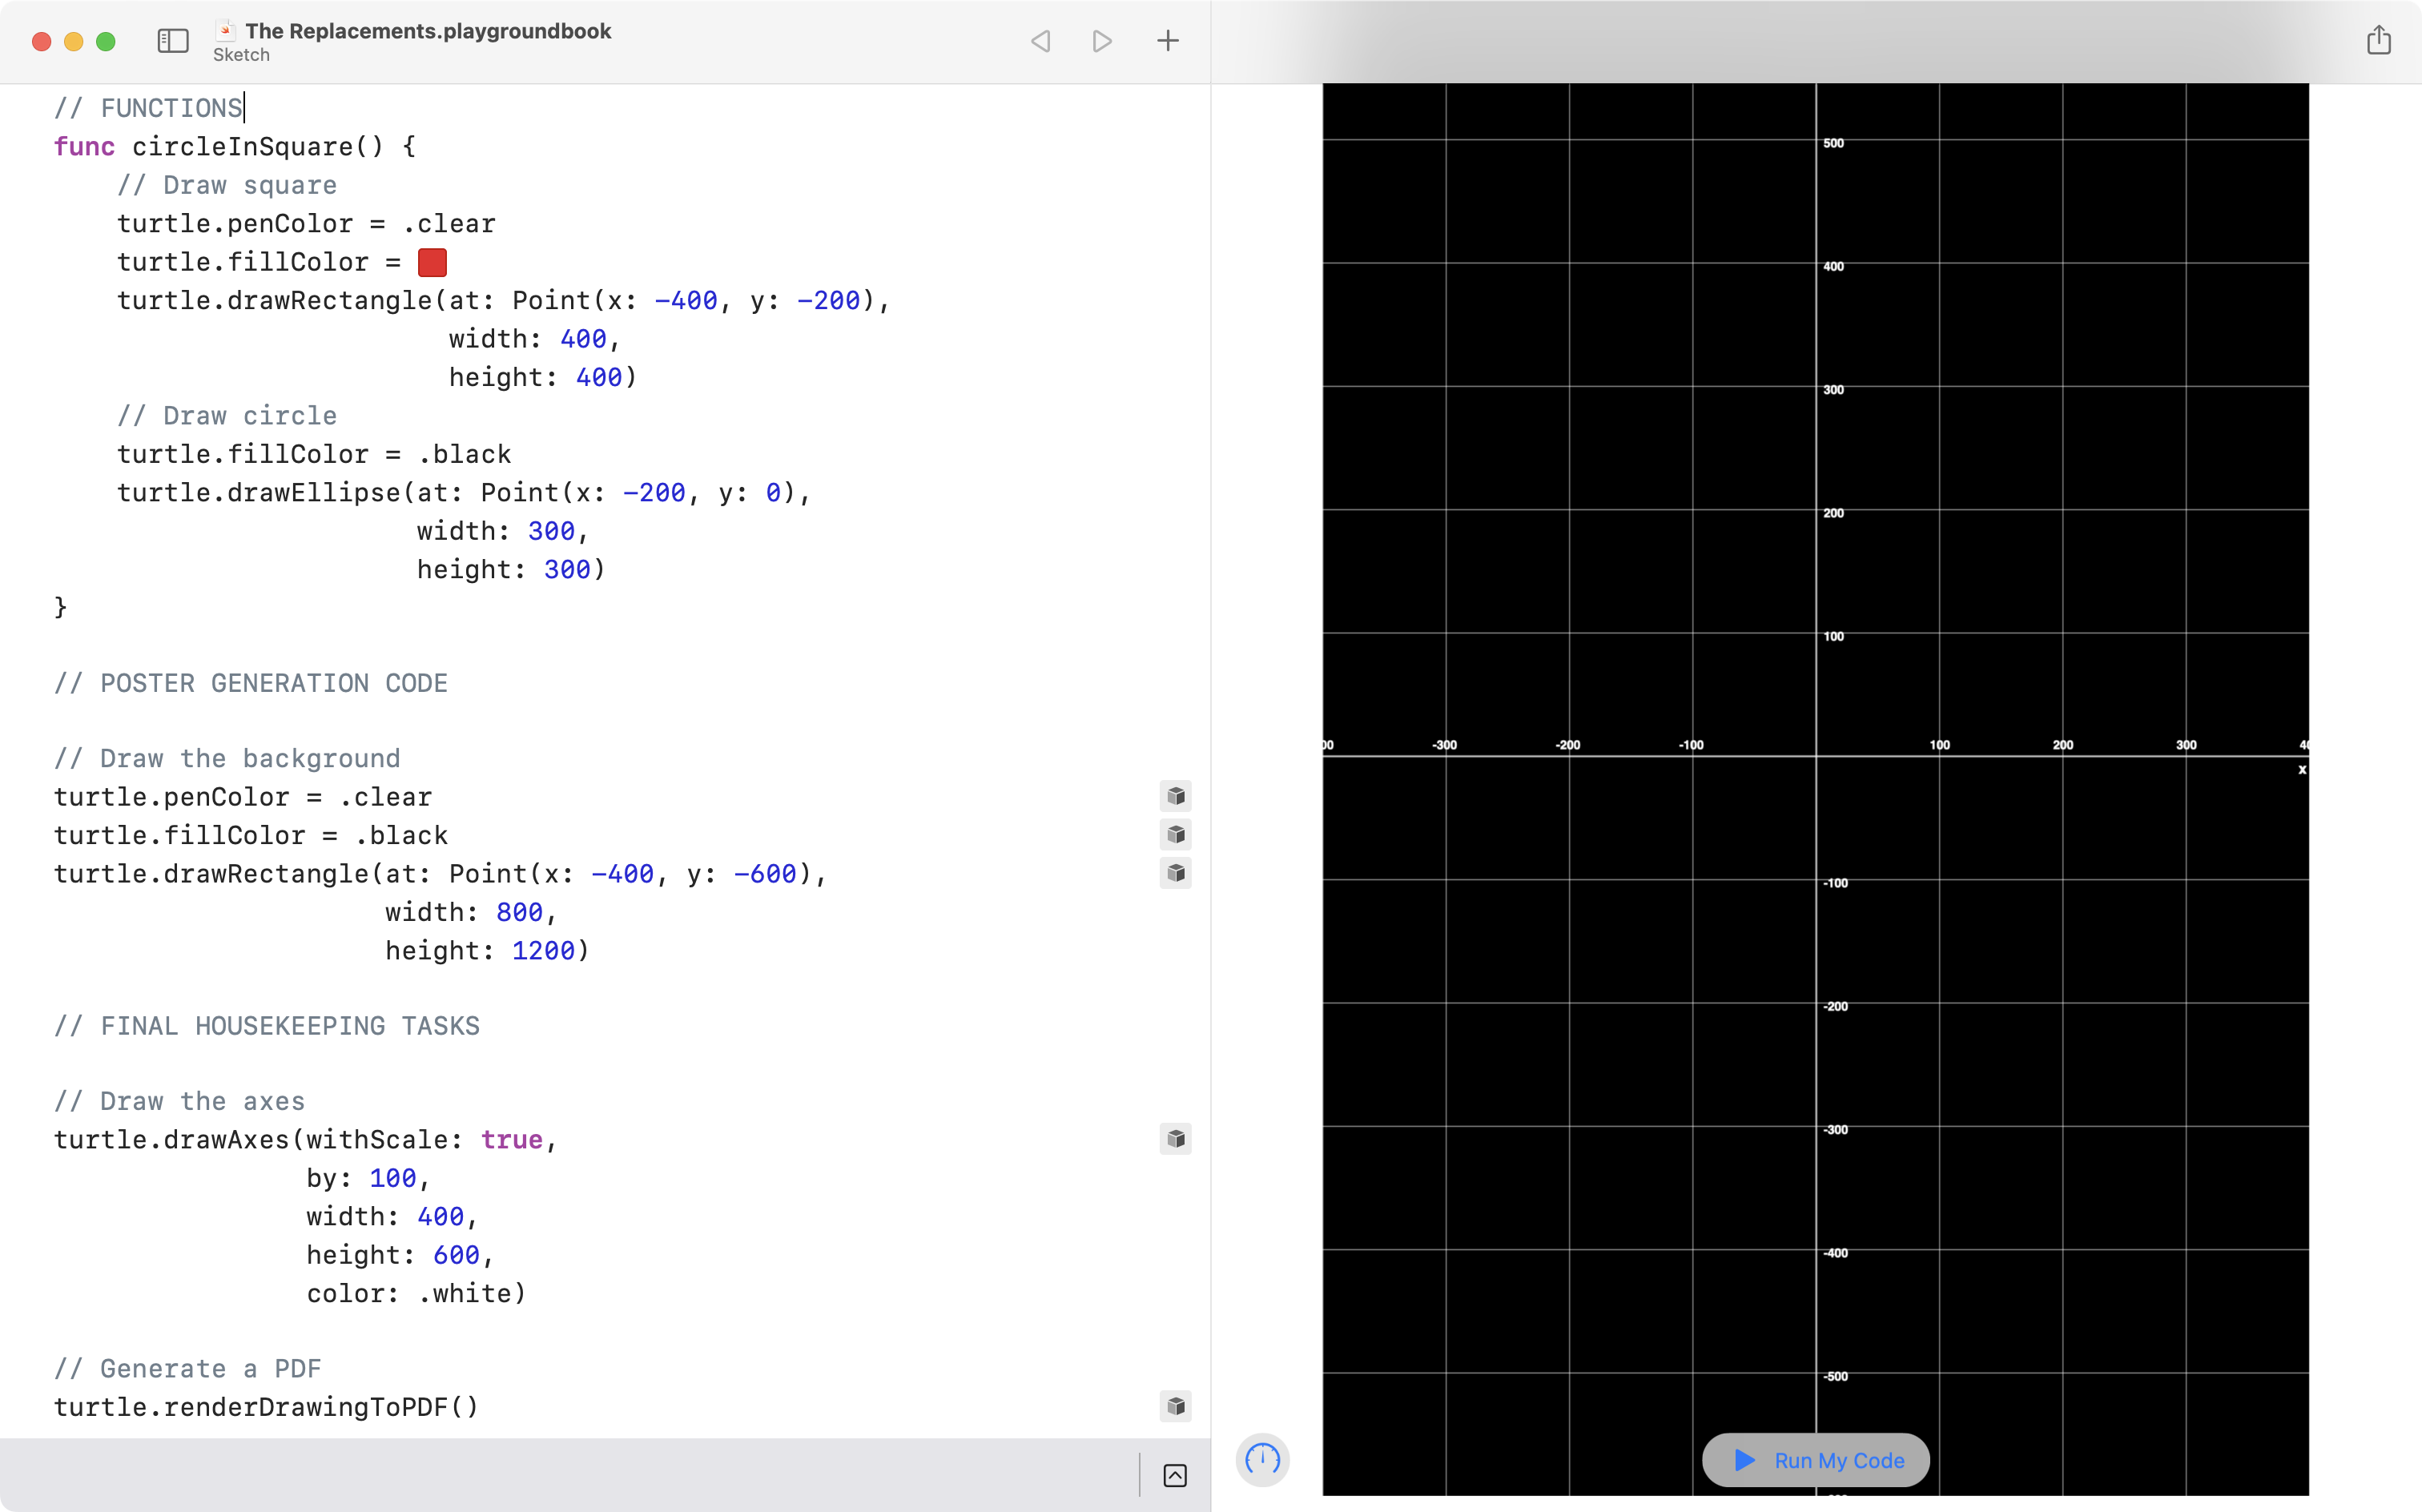
You can use this starter code – copy and paste this into your new playground:
// POSTER GENERATION CODE

// Draw the background
turtle.penColor = .clear
turtle.fillColor = .black
turtle.drawRectangle(at: Point(x: -400, y: -600),
                     width: 800,
                     height: 1200)

// FINAL HOUSEKEEPING TASKS

// Draw the axes
turtle.drawAxes (withScale: true,
                 by: 100,
                 width: 400,
                 height: 600,
                 color: .white)

// Generate a PDF
turtle.renderDrawingToPDF()
Run the playground
Every gig poster will begin with drawing the background.
Note that here we draw the axes in white so that they show up against the dark background:
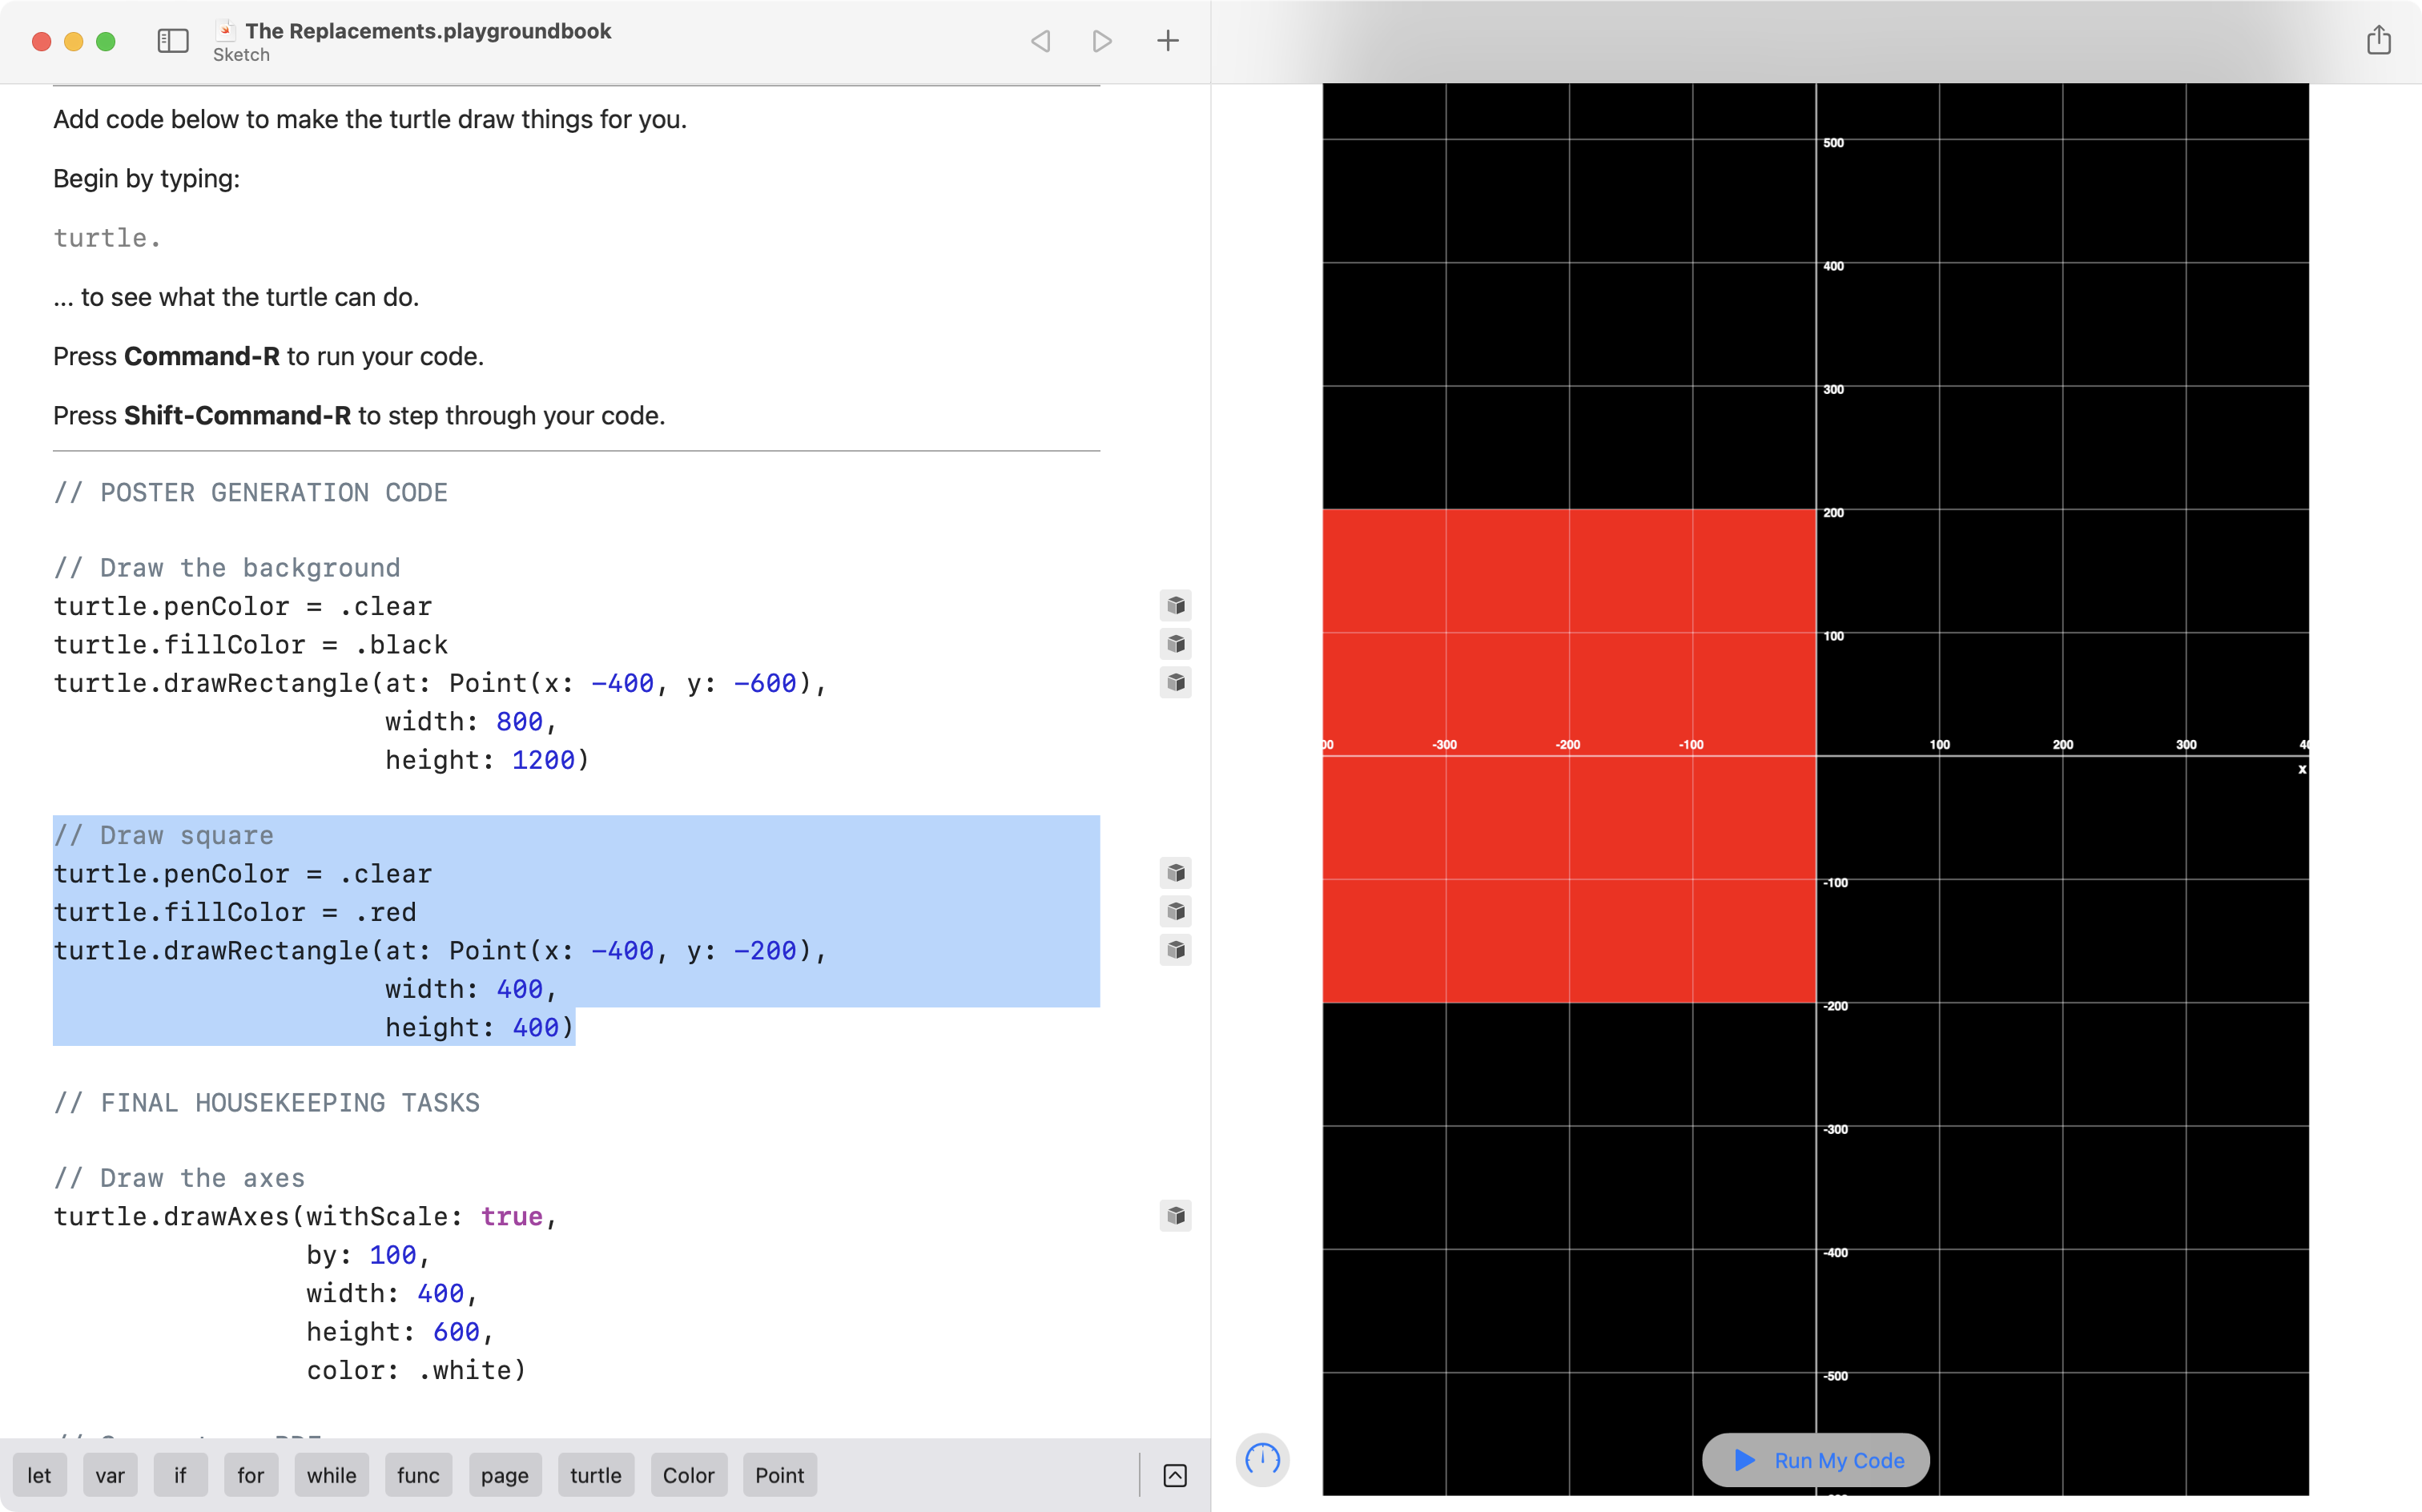
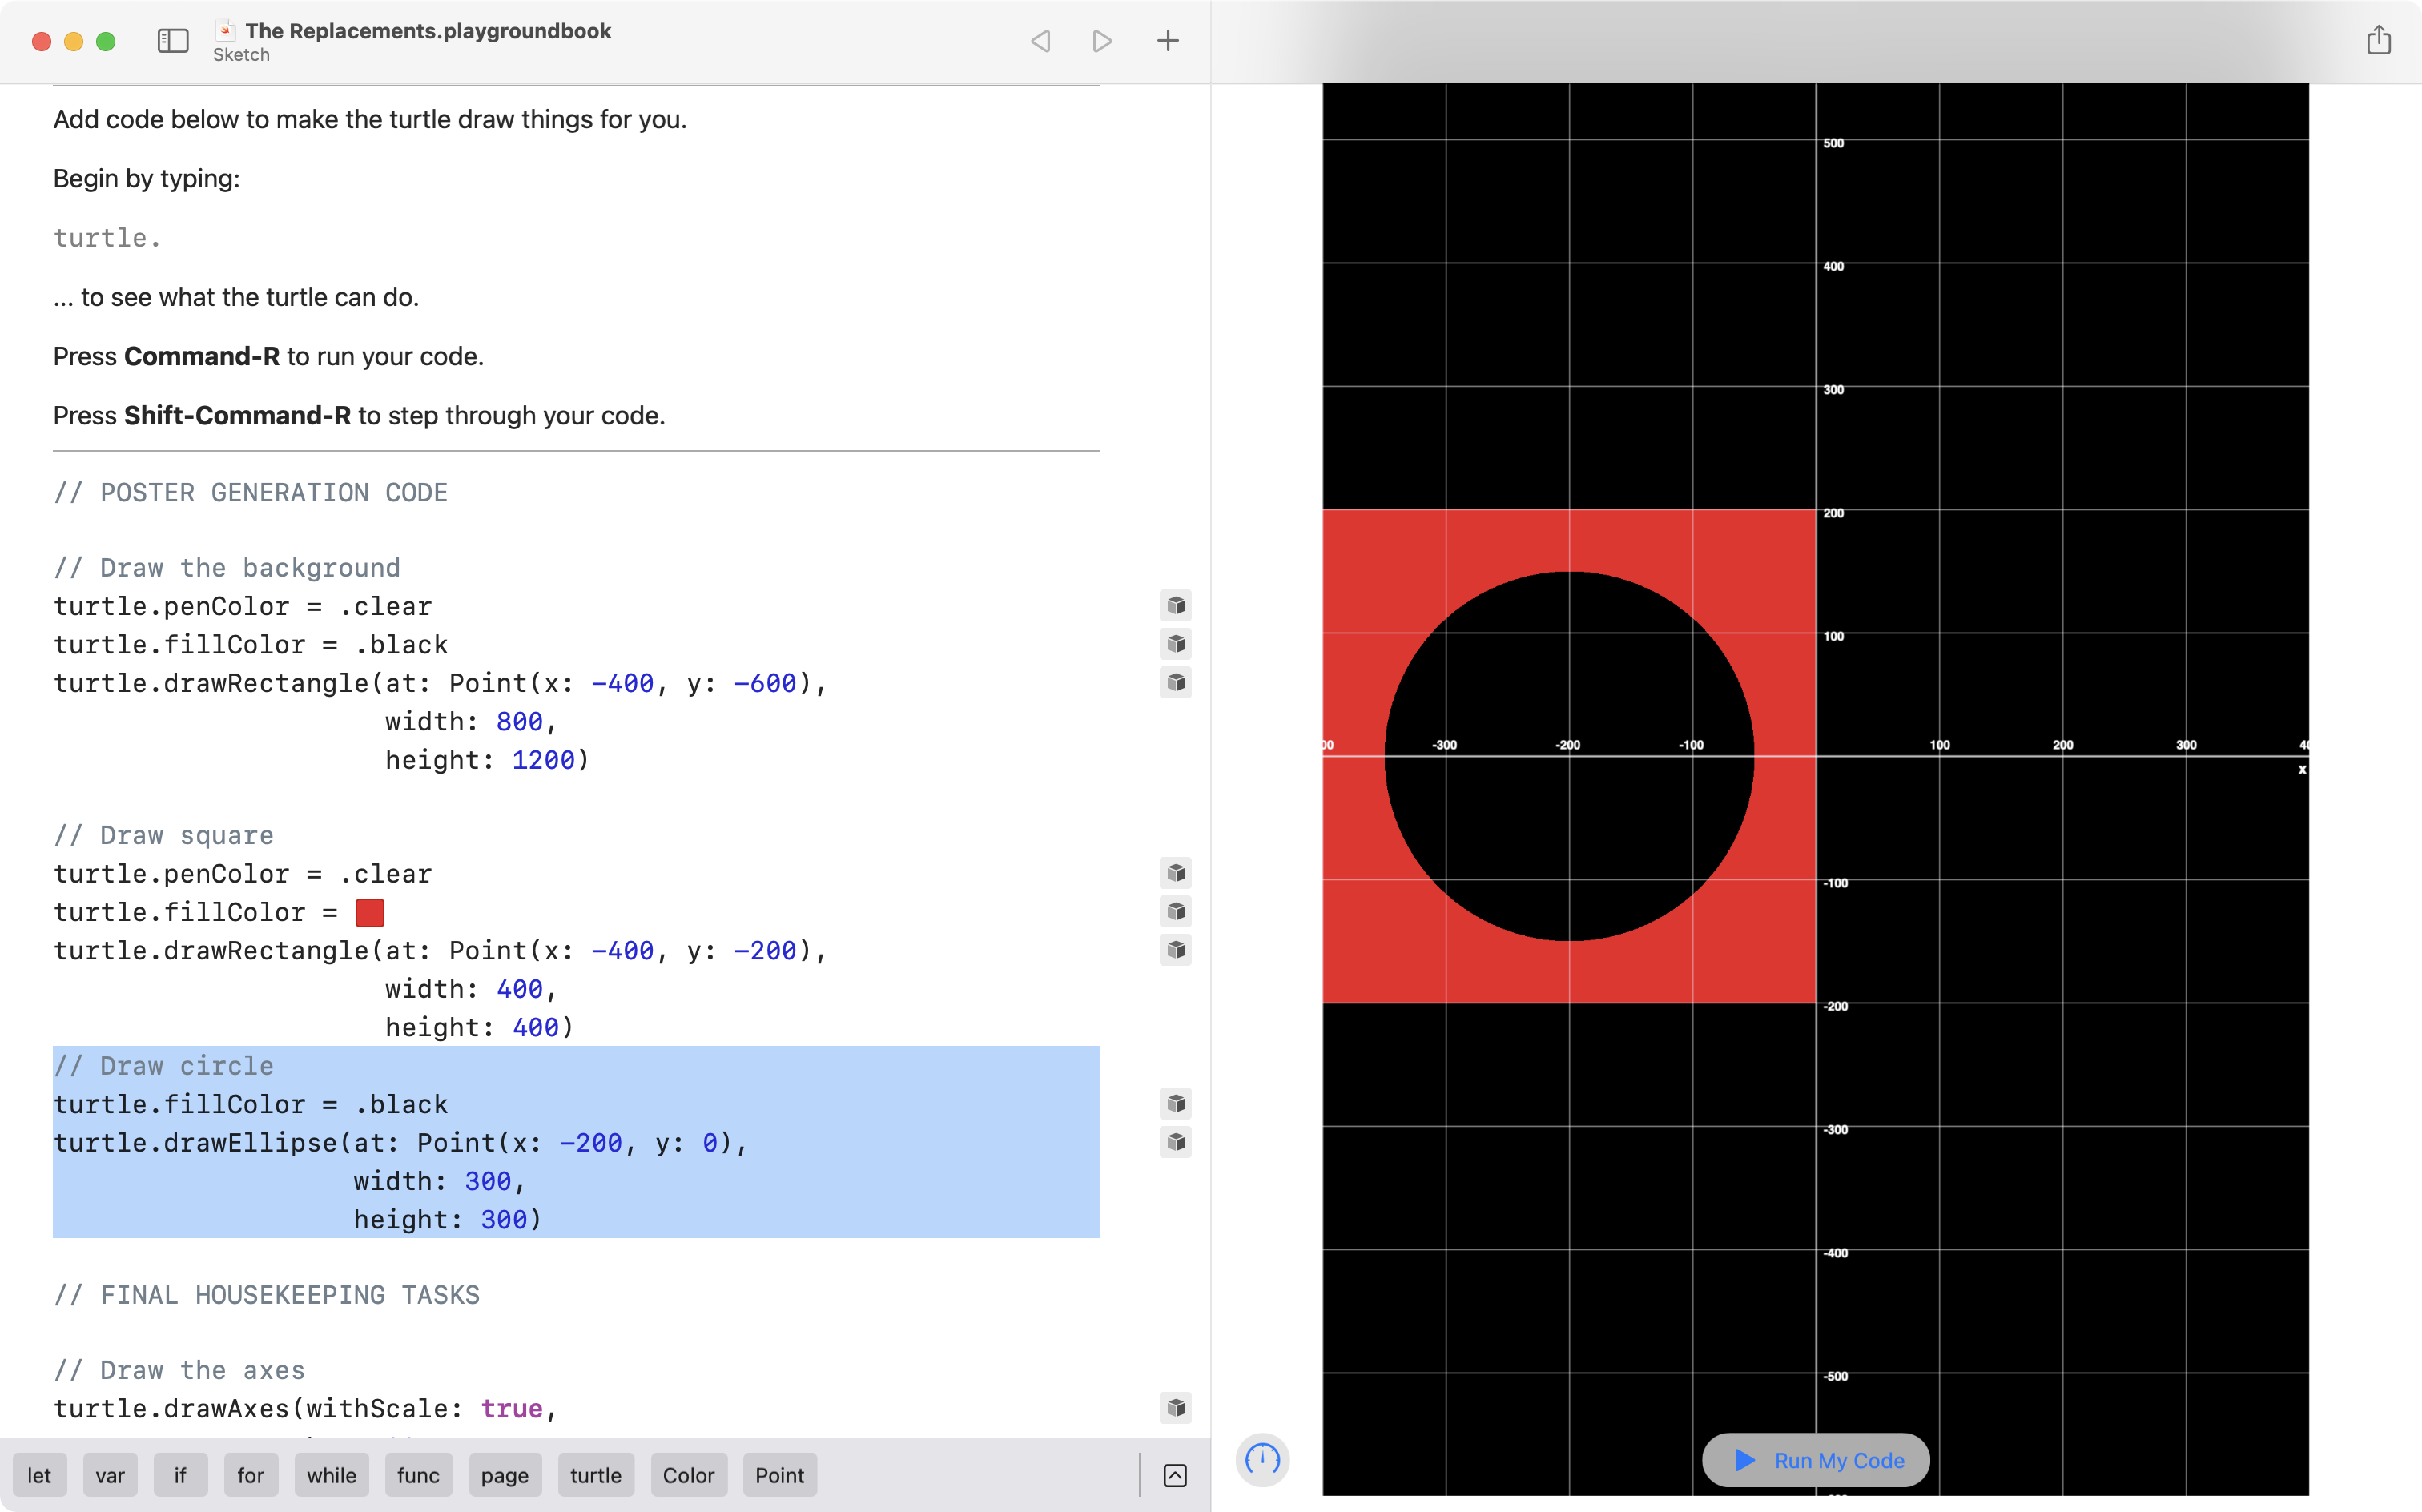
Draw the circle and square pattern
Draw the square
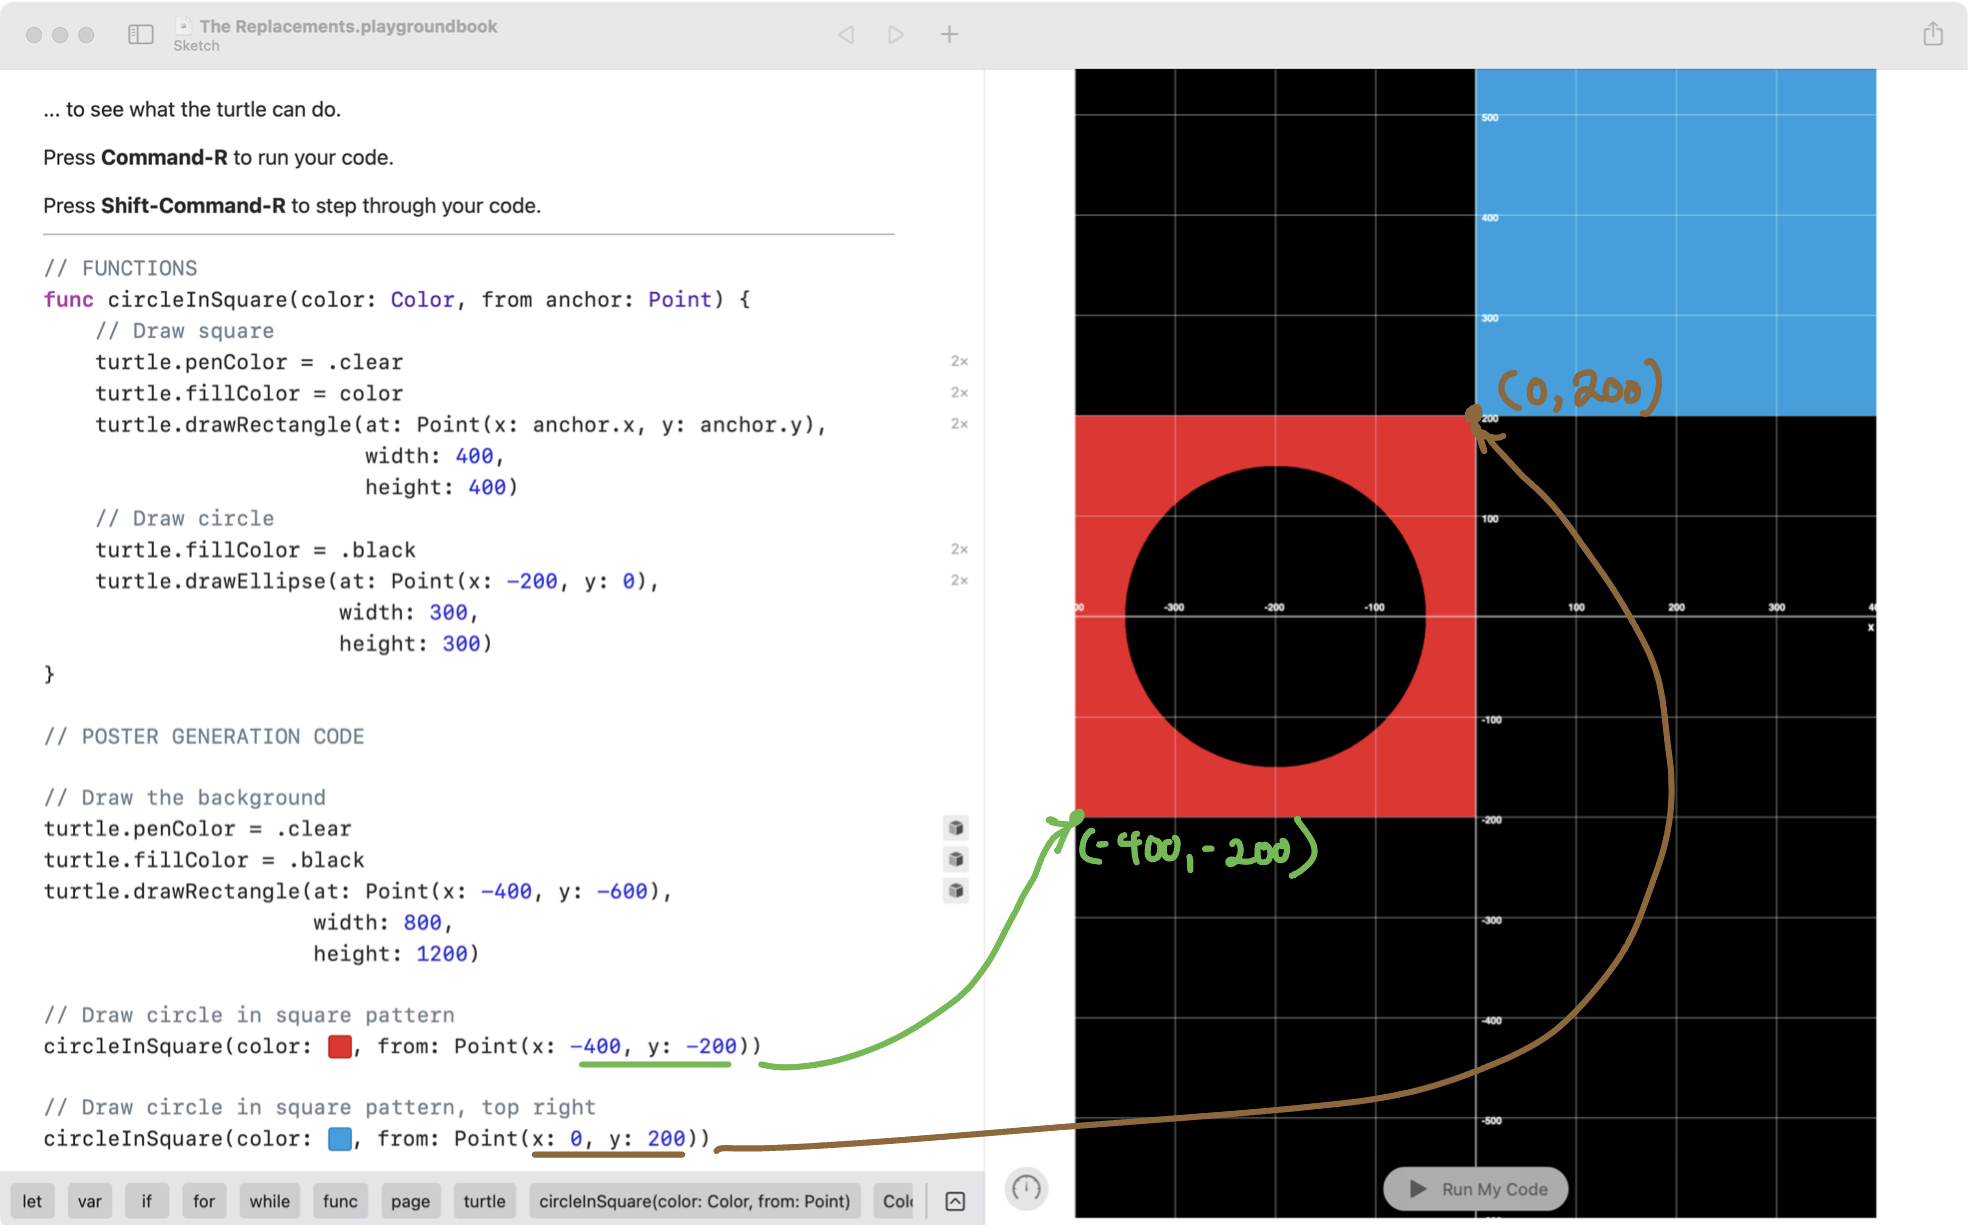
According to the plan, the second step is to draw the circle and square pattern:
Our plan notes that the square is anchored by its lower-left corner at
This is straightforward to implement:
Adjust the color
If you look closely, however, you will see that the shade of red does not quite match what we see on the poster.
So, use the color well and eyedropper tool to get the correct shade of red:
Draw the circle
Next we need to draw the circle.
Recall that a circle – or an ellipse – is anchored by a point at its centre.
Looking closely at the grid, we can see the circle is centered at
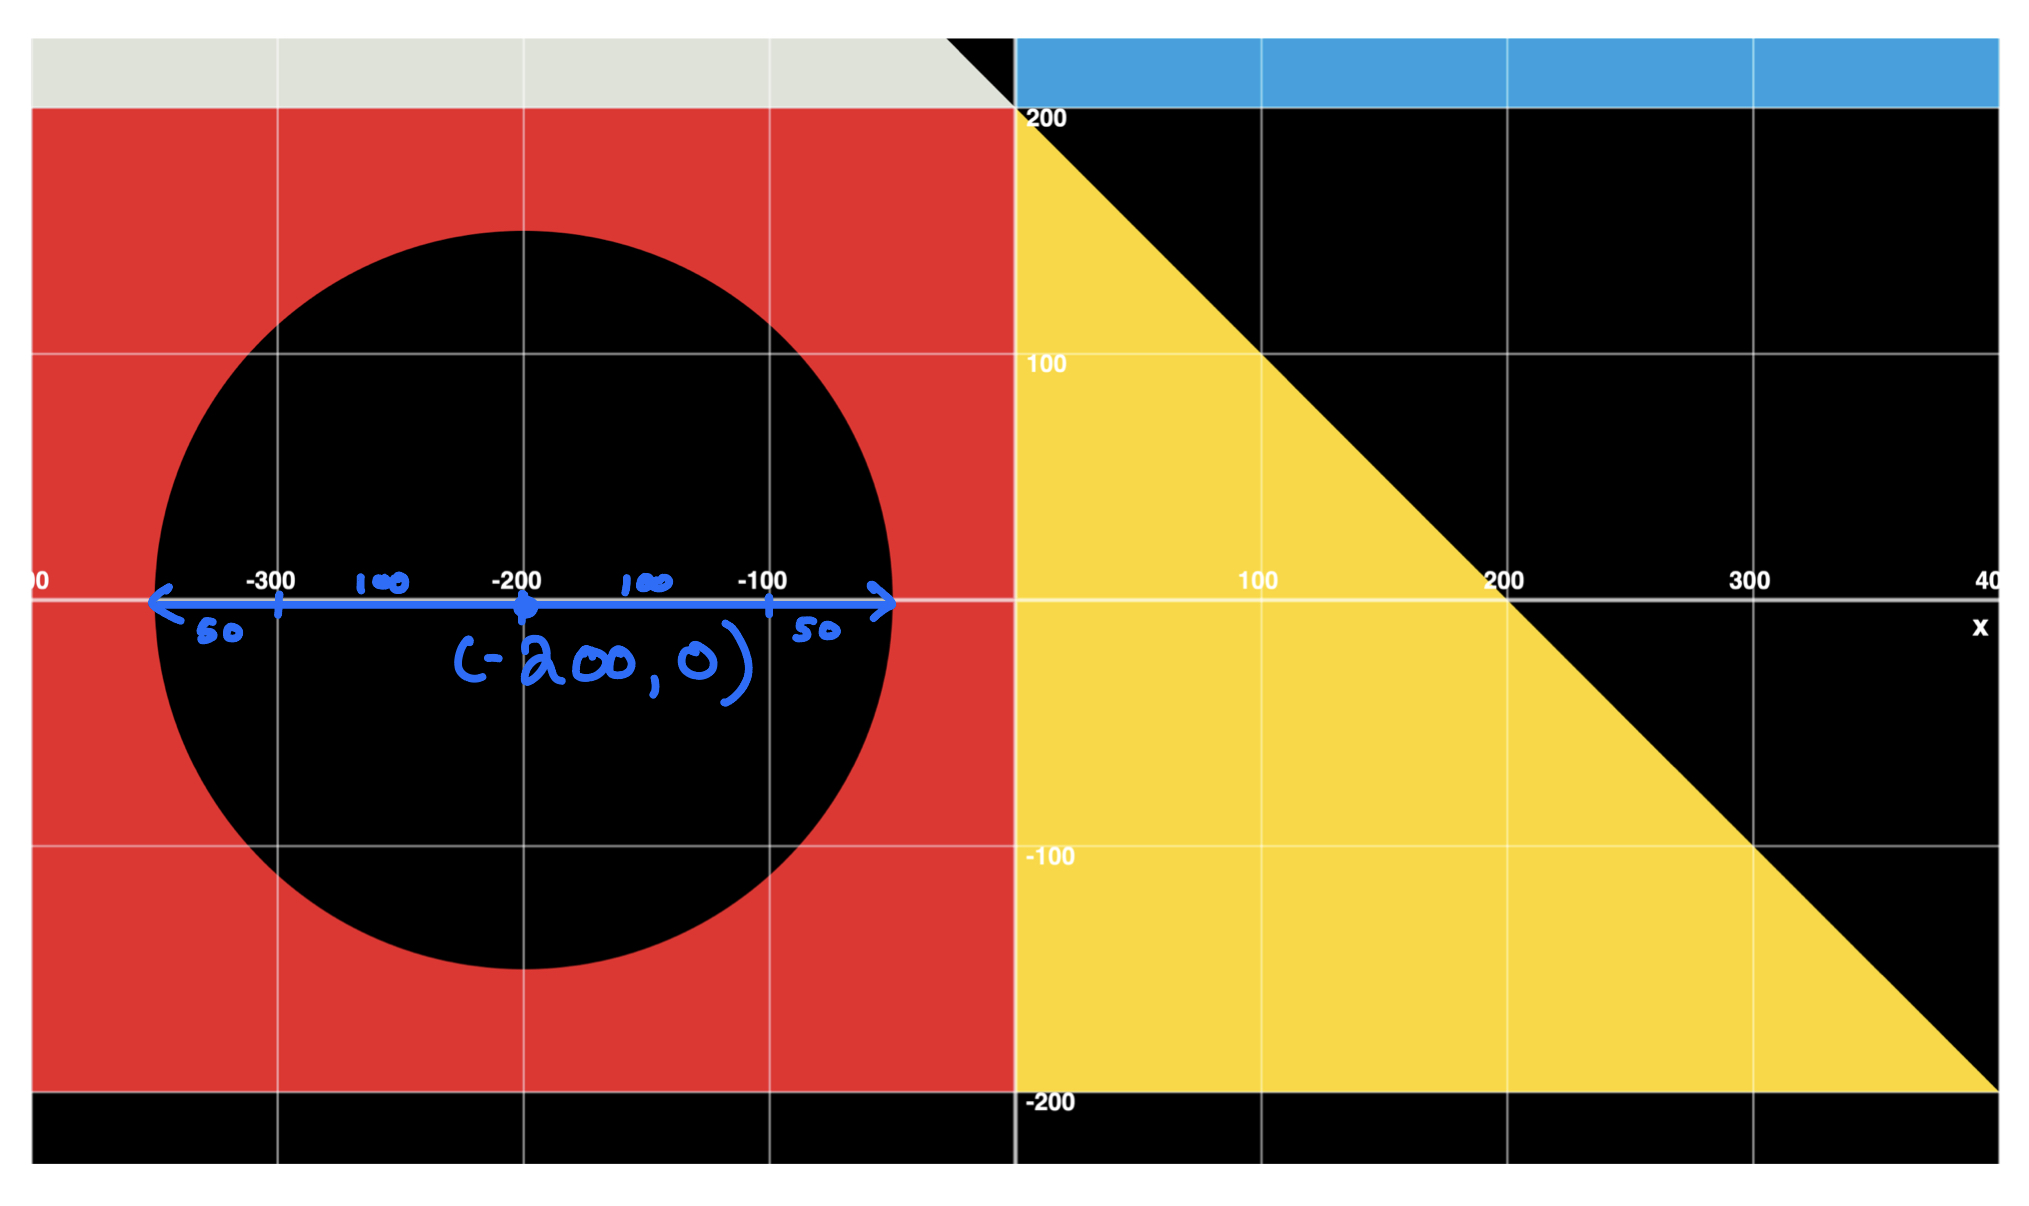
This, too, is easy to implement. Add the following code:
Define the function
Now, we noted in our plan that we should use a function to repeat this pattern in the top right corner of the drawing – the only difference being that the colour is blue:
So now we will begin the process of abstraction.
Right now the code to draw a circle inside a square is concrete – it works for one particular instance of that pattern.
To begin the process of abstraction – making the logic "general purpose" so that we can re-use it – we can start by putting the current logic into a function.
It's a good idea to keep functions at the top of your code. Note how keyboard shortcuts and autocomplete are used to avoid writing code manually:

If we run the playground using the Command R keyboard shortcut now, you will note that it seems we have lost our circle in square pattern:
However, that is because we have defined the function – taught the computer how to do a new task – but we have not yet invoked or called the function.
Invoke the new function
We need to invoke, or call, the function we just wrote. Add this code right after the code that draws the background:
// Draw circle in square pattern
circleInSquare()
Here is an animation showing how to do that:
Add the first parameter
Now that our logic has been placed inside the function – encapsulated – we can actually begin to make the function abstract – or reusable.
To do this, we just need to identify what changes between the first instance and the second instance of the pattern:
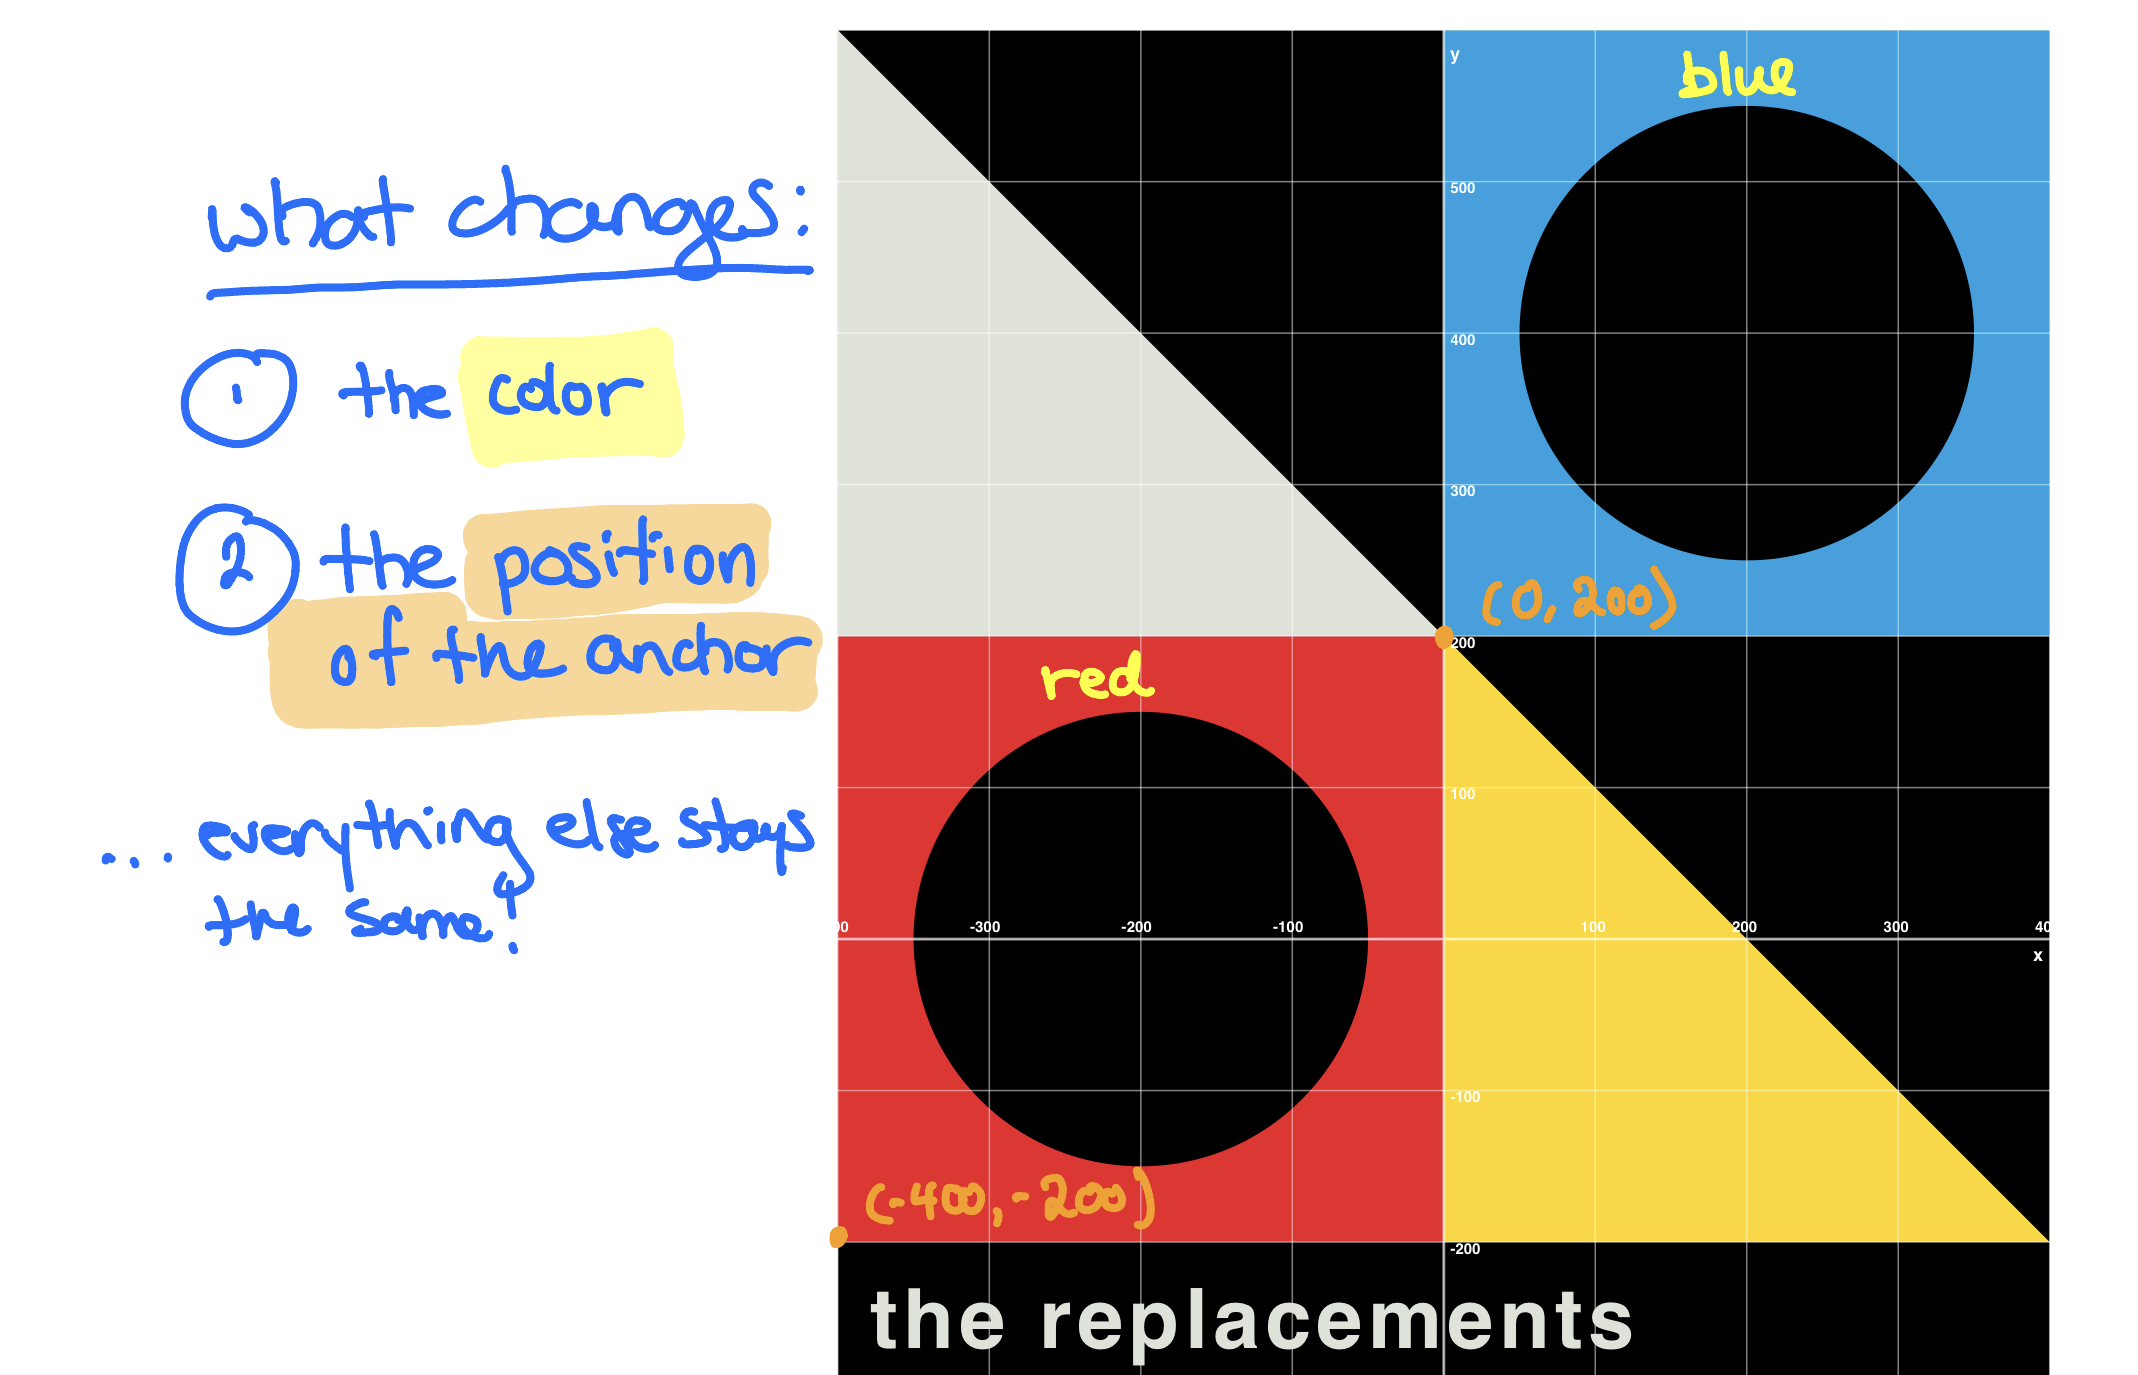
The parts that change must become parameters in our function.
Think of parameters like questions that a function needs to ask in order to do its job for you.
In turn, once we add parameters, we must supply arguments when we invoke a function.
Think of arguments like answers that you must provide when asked questions by the function.
The first parameter we'll add to the function is the question – what color?
Make this addition to your function – note the new code highlighted in blue:
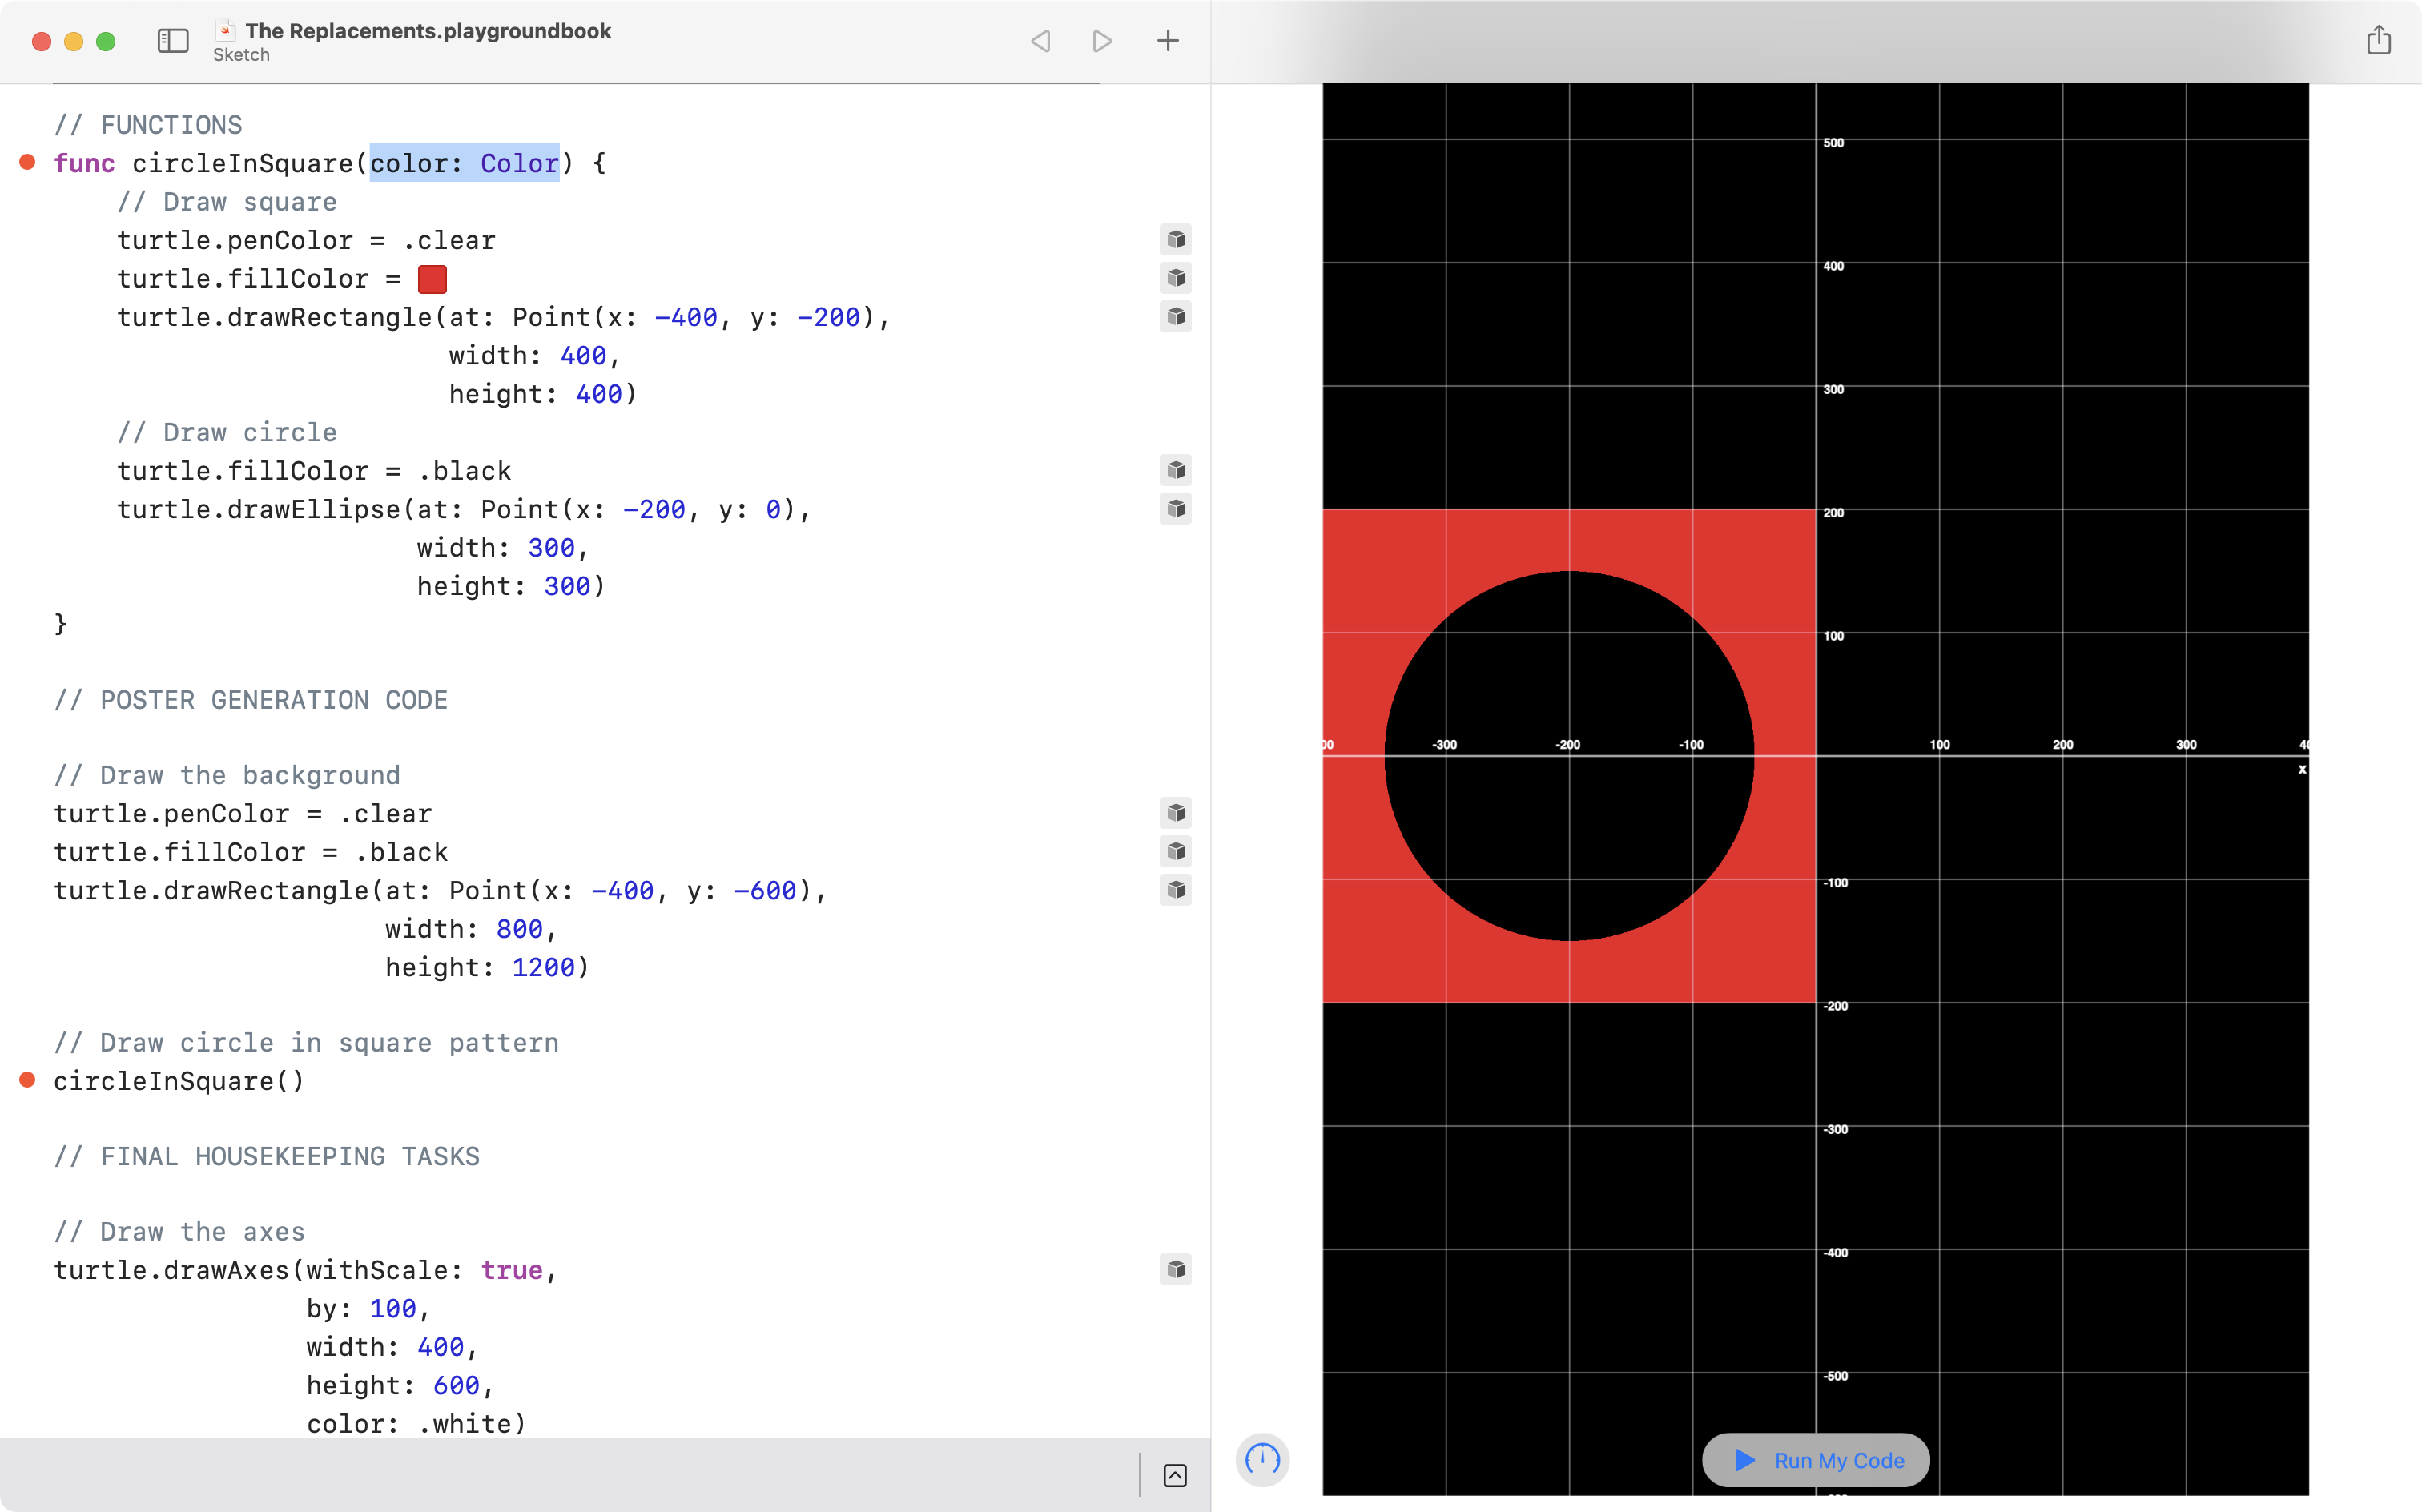
The name of the new parameter is color.
The data type, or type, of the parameter is Color.
As soon as we add the parameter to the function, we see a red bubble indicating an error at the call site for our function – where we are invoking it.
What this means is that we must answer by supplying an argument to the parameter – the question – the function is now asking.
Provide an argument
Make this change to provide that answer:

Running the code afterward, we see that nothing changes yet. That's expected; we will fix this soon.
Add the second parameter
Referring to our detailed plan, the next question our function needs to ask is – where should I draw the pattern?
Make this change to your function – note the new code highlighted in blue:
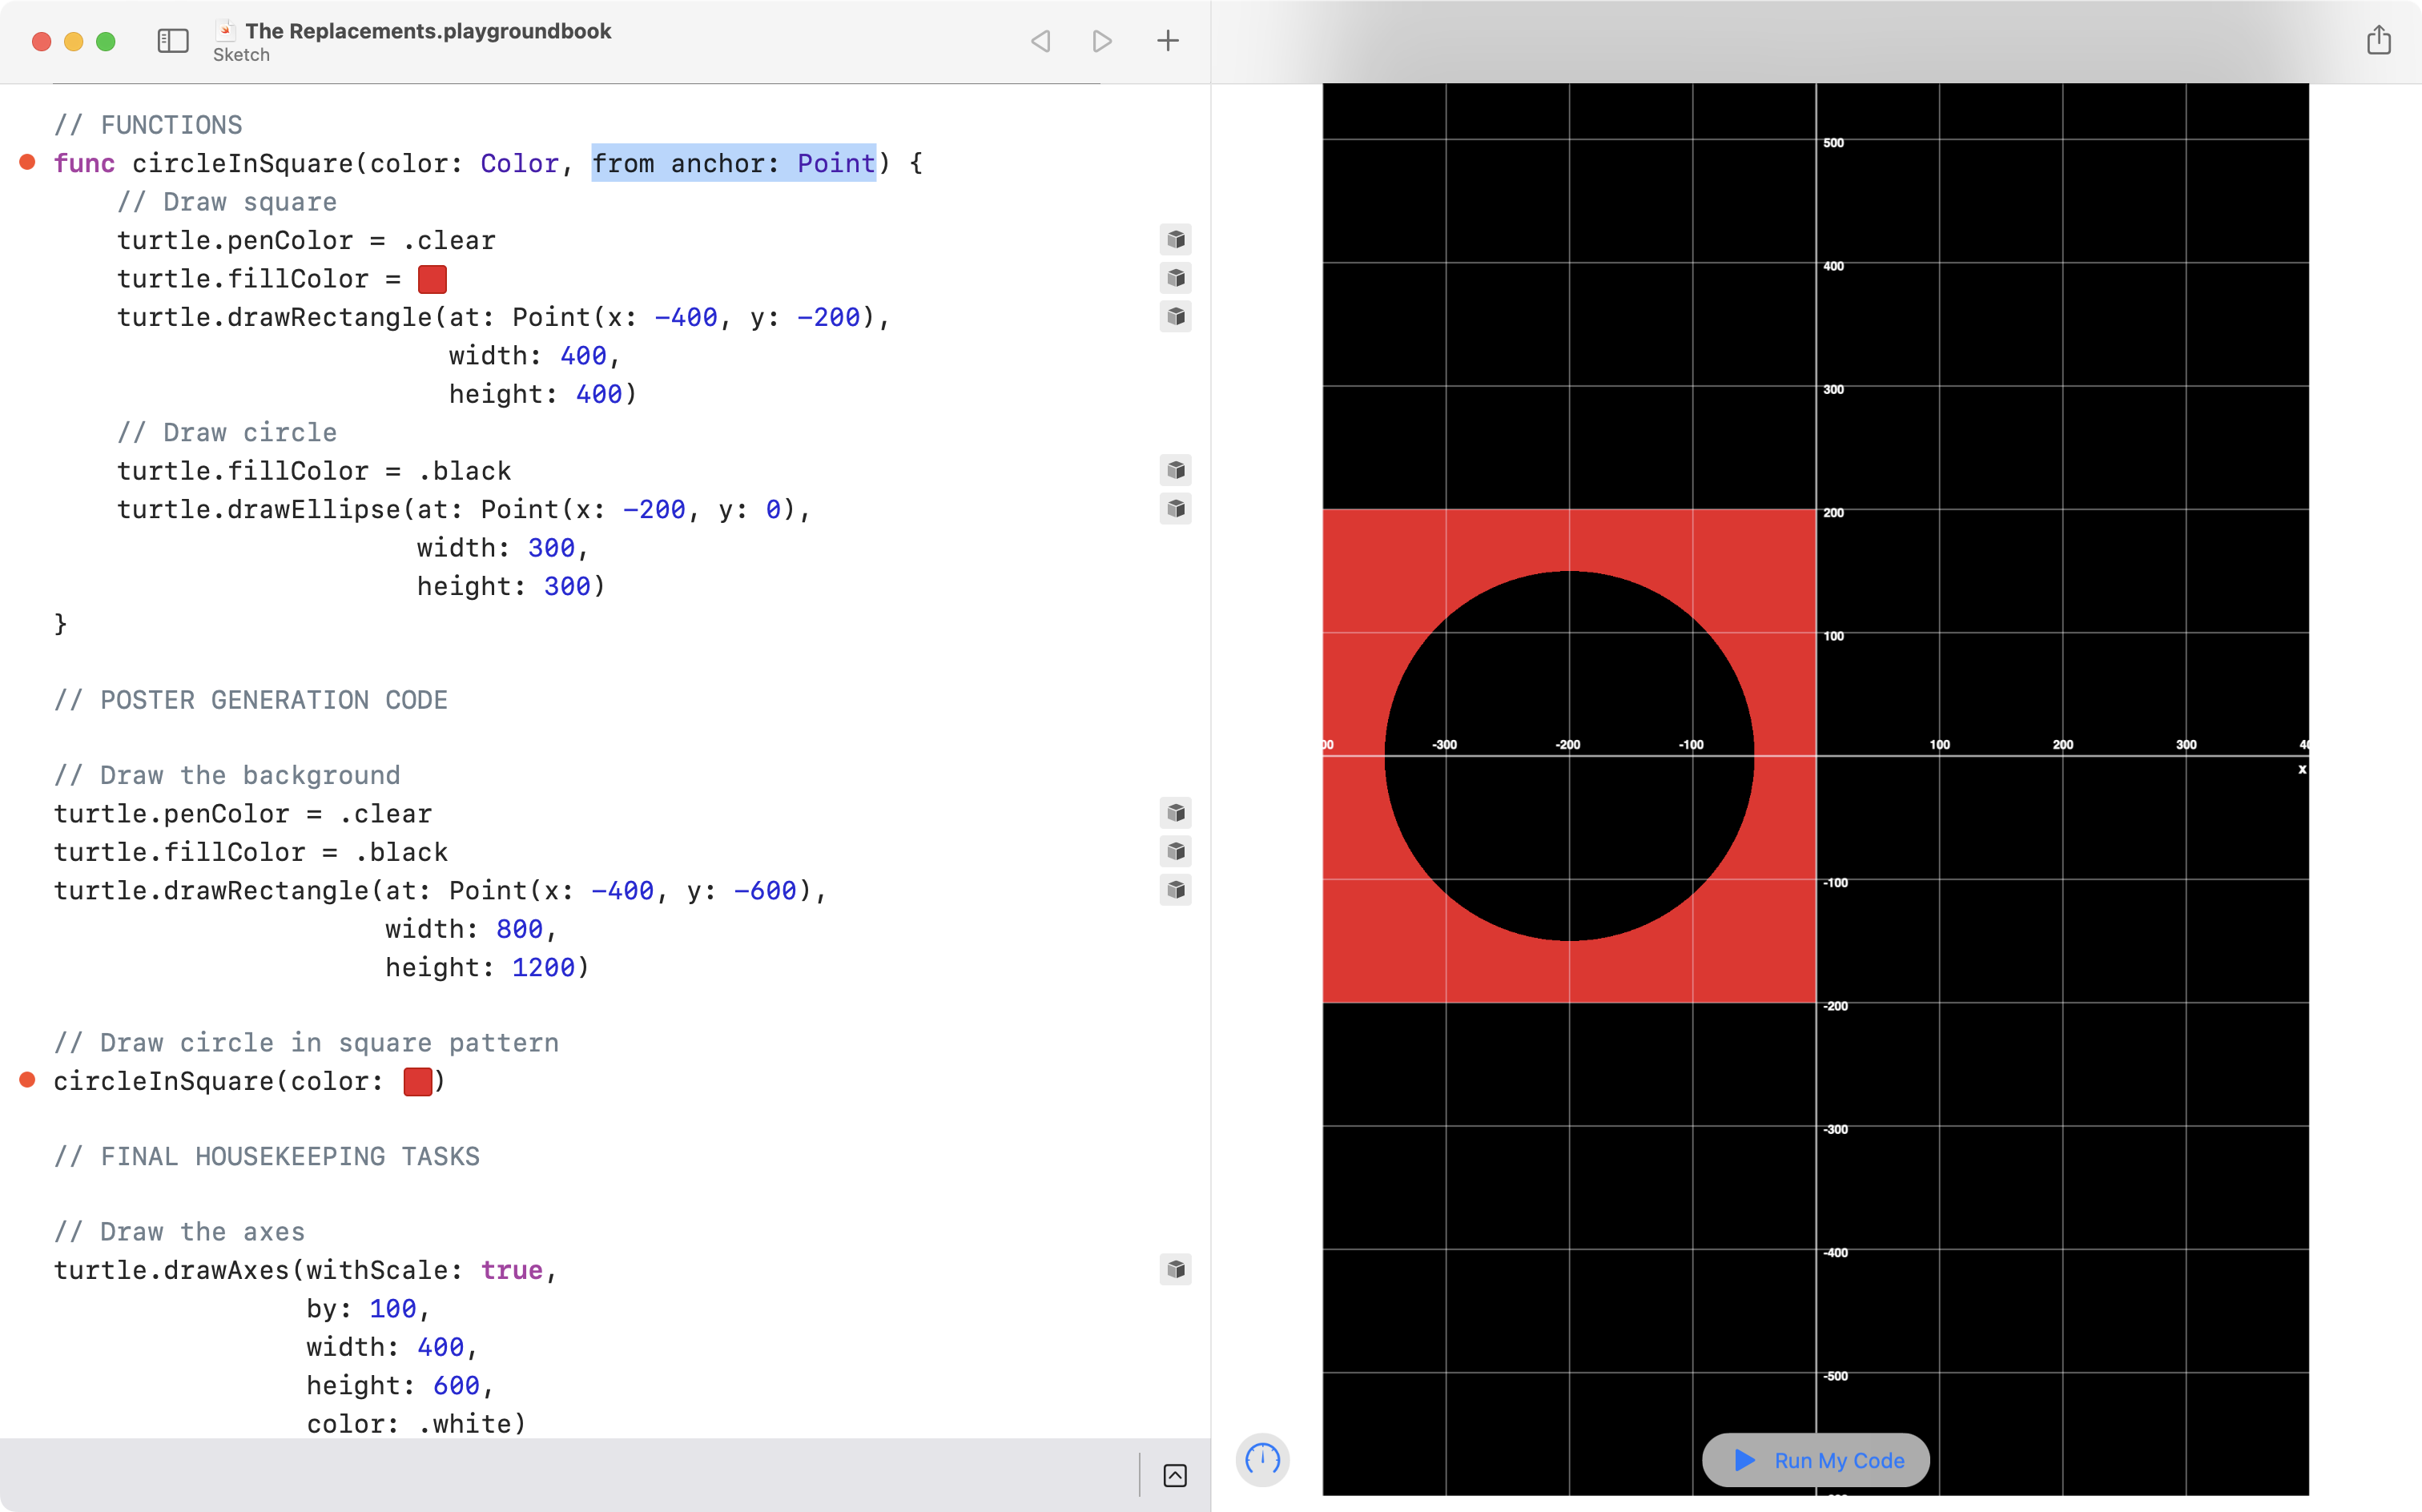
The external name of the parameter is from and this will appear at the call site, in a moment.
The internal name of the parameter is anchor and this will be used inside the function, a little later on.
The data type of the parameter is Point.
The function is now asking: "From what anchor point should I draw the shapes?"
Provide another argument
We must answer the question by supplying another argument. We know the square in this first instance of the pattern is anchored at it's bottom left corner, the point
Nothing very exciting is happening yet. We've done a lot of work and not seen any benefit! 😥
That will change soon.
So far we have:
- defined the function
- added parameters to make the function re-usable
- supplied arguments to each parameter
Use the parameters within the function
Let's refer back to our plan now:
We want to draw the pattern again, this time in blue, and at the top right corner of the drawing, anchored from the position of
Let's give this a shot – add the following code to invoke (or call) the function a second time:
When we invoke the function a second time – supplying different arguments – nothing happens? 😤
That's OK – we've forgotten one final, but very important, step in the process of abstraction.
We've made our function ask the necessary questions – and we've answered those questions each time we invoke the function.
The problem is – we are not yet using the answers inside our function.
Use the color parameter
So, first – we will use the color parameter in the function – make these changes:
After running our program, we see an improvement. A blue version of the pattern is drawn – but it is drawn in the wrong location. The blue version is drawn over top of the first version in red. We can see this clearly if we run the program, stepping slowly through the code:
To fix this, we must complete the process of abstraction for this function.
We must use the answer for where to anchor the drawings from.
Use the anchor parameter to draw the square
Make these changes to use the anchor parameter – the square will be drawn at the
We have literally performed abstraction here – inside the function, we replaced the concrete co-ordinates of:
...with the parameter's values instead:
As a result, we see the square drawn in two different positions, since we supplied two different points as arguments each time the function was invoked:
Use the 'anchor' parameter to draw the circle
Now we must use the anchor parameter to draw the circle in the correct location.
Before we make the changes in code, let's examine an even more detailed version of our plan – noting that each circle is positioned 200 pixels above and 200 pixels to the right of the anchor point:
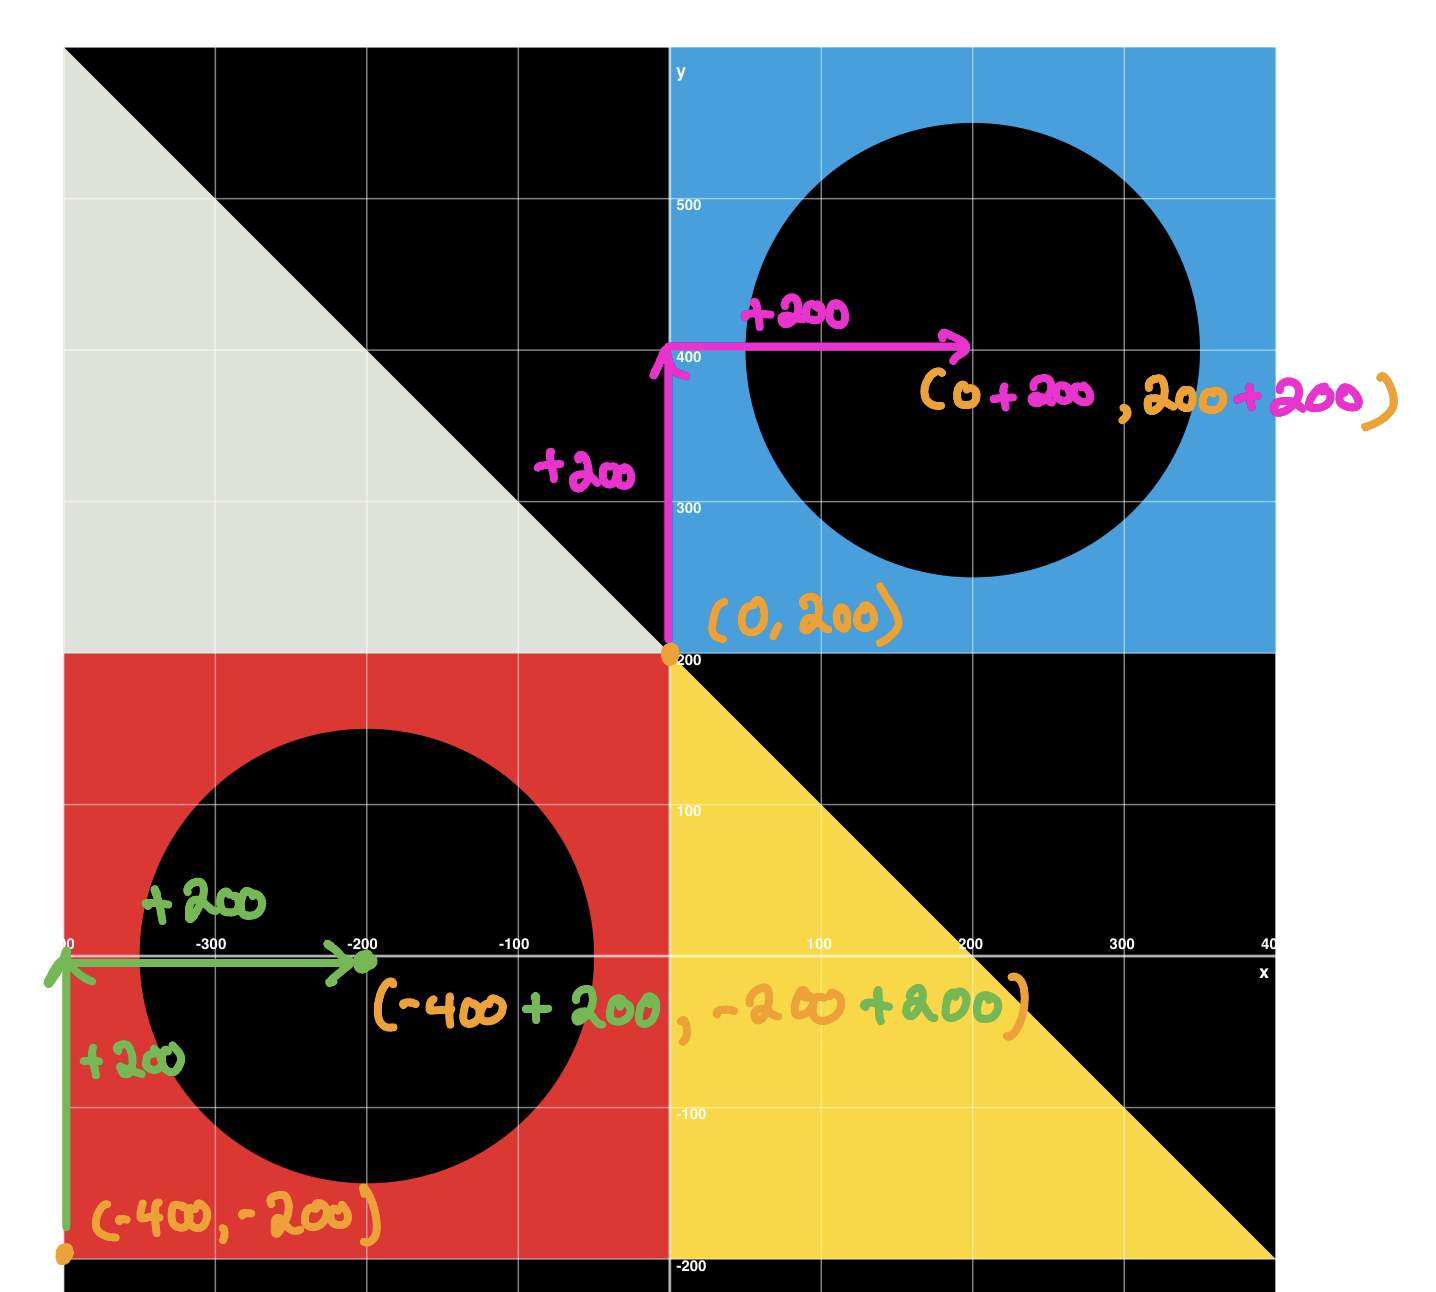
So if we make these edits:
... we'll see the circles positioned correctly.
Whew! That was a lot of ground covered. Great work! 🎉
Exercise
Now it is your turn – complete this poster:
Like we just did, you should:
- draw one of the triangles
- define a function to draw that triangle instead (encapsulate)
- perform abstraction by:
- revising the function to add parameter(s) – the questions
- invoking the function to provide argument(s) – the answers
- using the answers inside the function, replacing concrete values with the values held in the parameters
Using the goToHome function will be helpful when you write the code to create your triangles.
Once you have drawn the triangles using a function, finish off the poster by:
- drawing the title
- drawing the smaller text
Feel free to copy-paste and modify the code from your Blur poster to help you finish up the titles for this poster.